
Get Clued-Up on Cuffs (and Bands!)
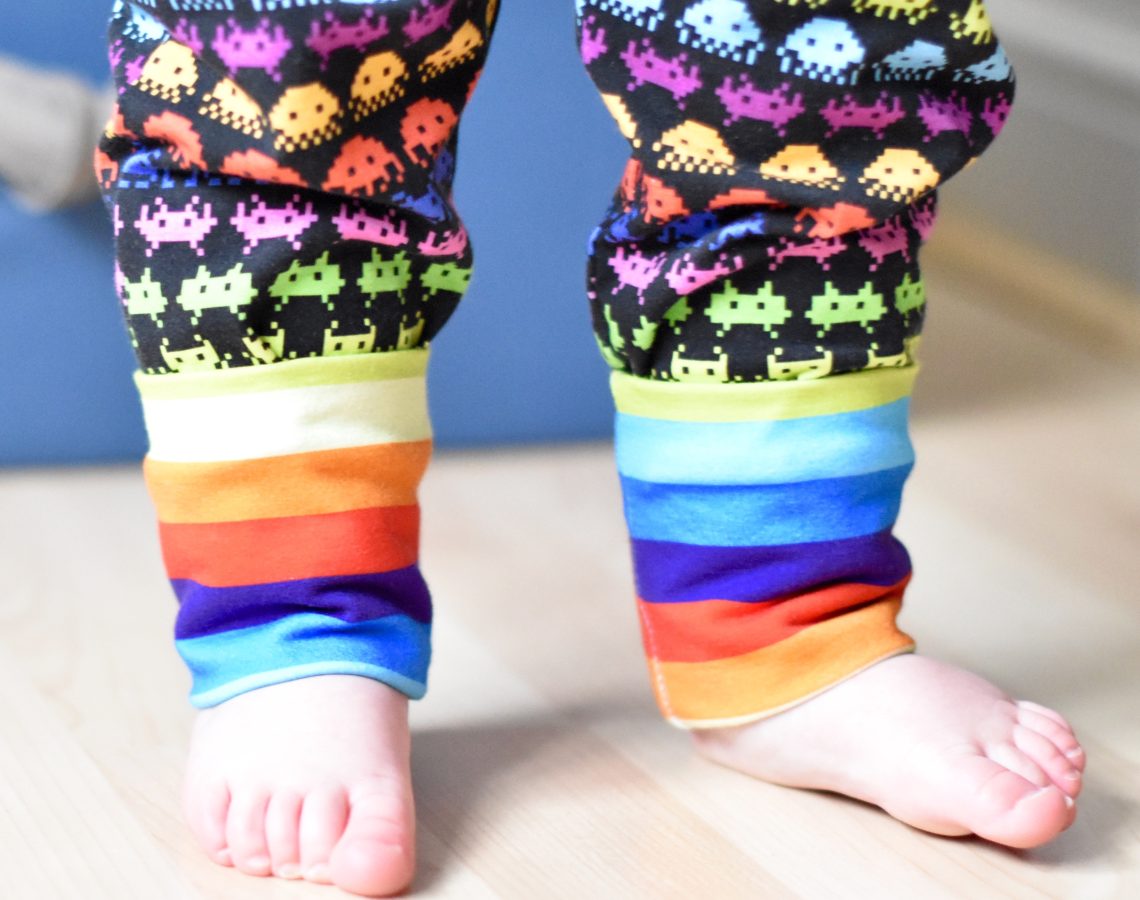
Cuffs are a great way to finish the raw edge on a garment – whether those are on sleeves or legs, at the waist, or around the neckline. They give a neat final look as all the sewn seams are hidden inside. They are comfy and cosy to wear as they have a slightly closer fit compared to a hemmed edge. PLUS, you don’t need to worry about finding a perfectly matching thread colour as they don’t need top-stitching. But cuffs and neckbands aren’t always plain sailing and many makers find them a little intimidating.
Check out these top tips for creating the perfect cuffs and neckbands…
Fabric Choice
When you are using a pattern that includes cuffs it is highly likely it’s a garment made from a stretch fabric (this is certainly the case with Waves & Wild patterns). Cuffs and neckbands need a stretch fabric too; sometimes that can be the same as your main fabric but sometimes you may need to choose something different. These are the main fabrics that are a good choice for cuffs and neckbands:
- Ribbing: usually this has excellent stretch and recovery (but always check as I have ordered ribbing in the past that was very stretchy but did not shrink back well!). It is very forgiving when used as cuffs and sits really well on necklines; plus the extra-stretchiness of it means it should go over heads easily.
- Cotton/Lycra Jersey: again this should have good stretch and recovery (but always check!) and you may have used this as the main fabric for the garment which means you might not need to buy anything extra. It is generally a little more rigid than ribbing so can’t always be used in place of ribbing without adjustment.
- Other stretch fabrics: you may have used something like French Terry or Sweatshirting for your main fabric; these fabrics can sometimes be used for cuffs and neckbands but you must make sure they have excellent stretch and recovery or you may find that they won’t stretch enough to fit your sleeve openings or they could make the neckband too tight to stretch over the wearers head! If you’re unsure then choose ribbing to be safe.
Top Tips for Sewing Cuffs and Neckbands
Cutting
Always check the direction of your fabric’s stretch. You may have a four-way stretch, which means the fabric stretches pretty much the same amount left-to-right and up-and-down, in which case it doesn’t matter too much which way you cut the fabric but if it has a print or a noticeable grain line you’ll need to make sure this is facing the right way. If you’re fabric is two-way stretch, or stretches better in one direction compared to the other, you need to make sure when you cut out your cuff pieces that the most stretch goes left-to-right so you can get your hand though a wrist cuff or your head through a neckband.
Make sure once you have cut out your pieces that you have them orientated in the right way before you start sewing. It should be very obvious with a neckband or waistband as the width will be a lot greater than the height. But for wrist and ankle cuffs this isn’t always the case and with some sizes within patterns, these cuff pieces could be close to square. Always make sure you have them positioned correctly before you sew the first seam; you can double check by looking for the fabric grain lines which should be running top to bottom on your pieces.
Construction
Your Waves & Wild pattern instructions will include all the information you need about how to make a cuff and how to attach it to your garment but here are a few extra tips for getting a really neat finish. If any of these tips feel overwhelming right now, come back to this post whilst making something with cuffs and it should be much clearer:
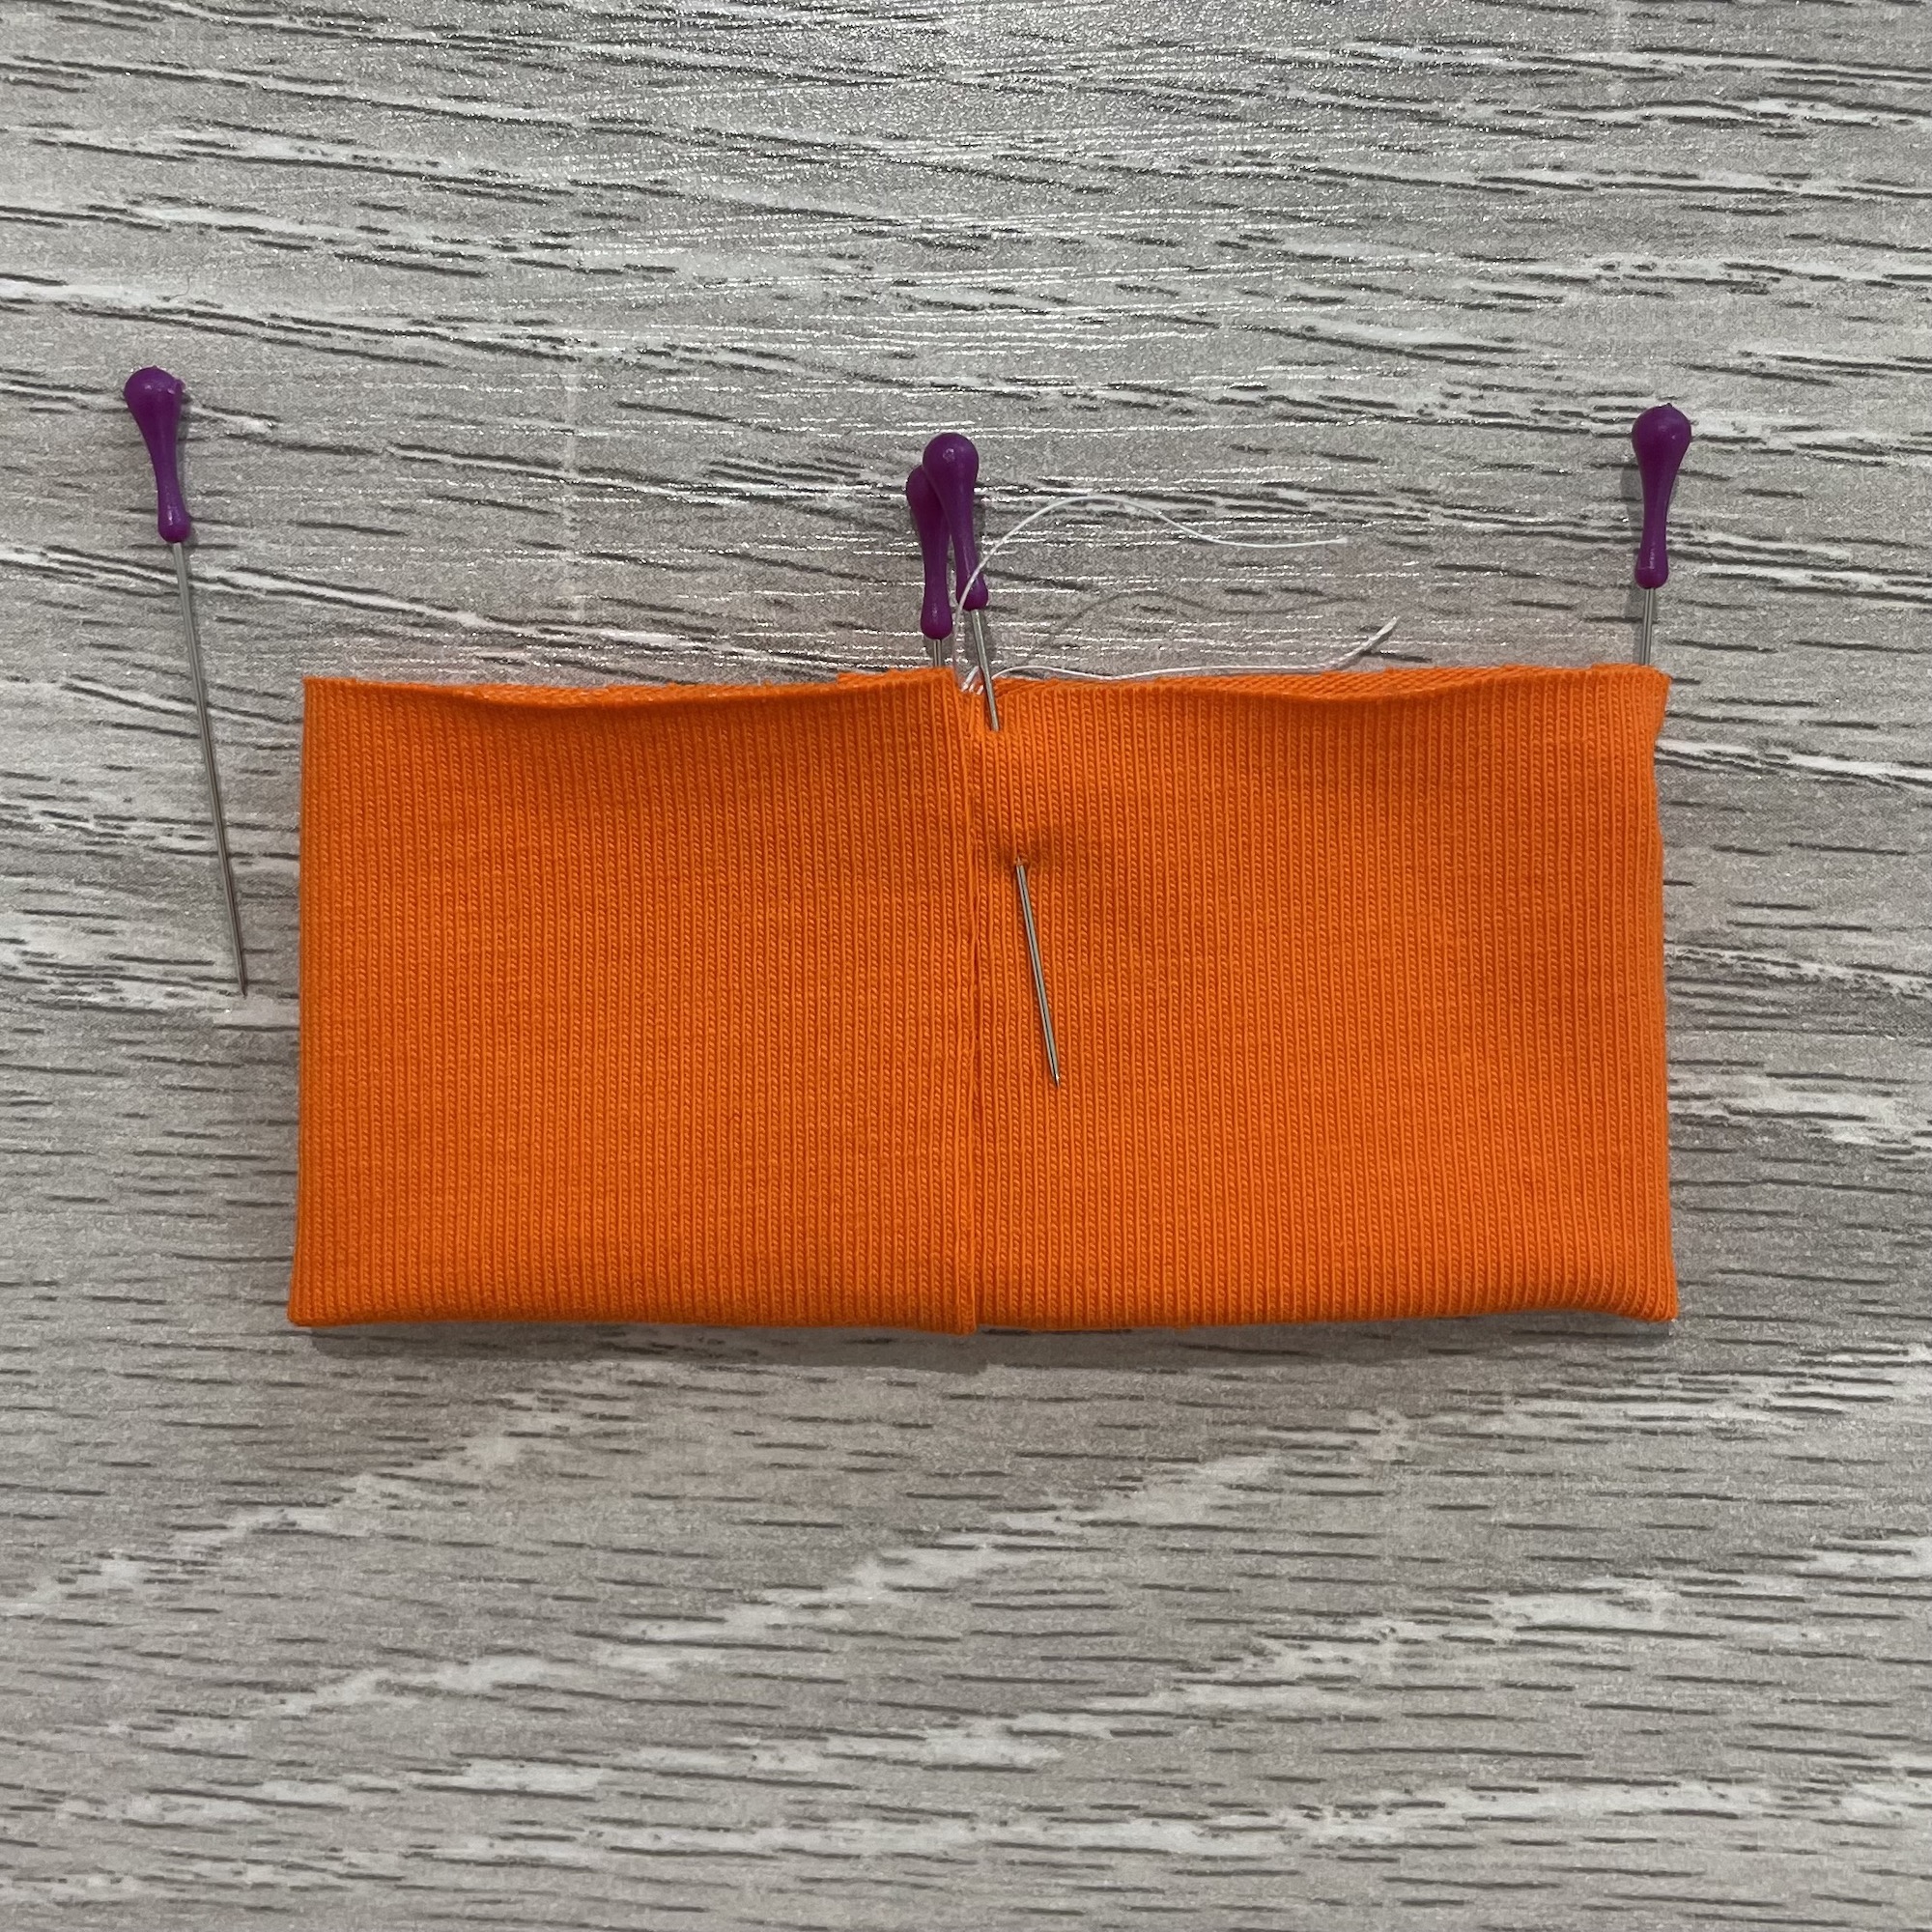
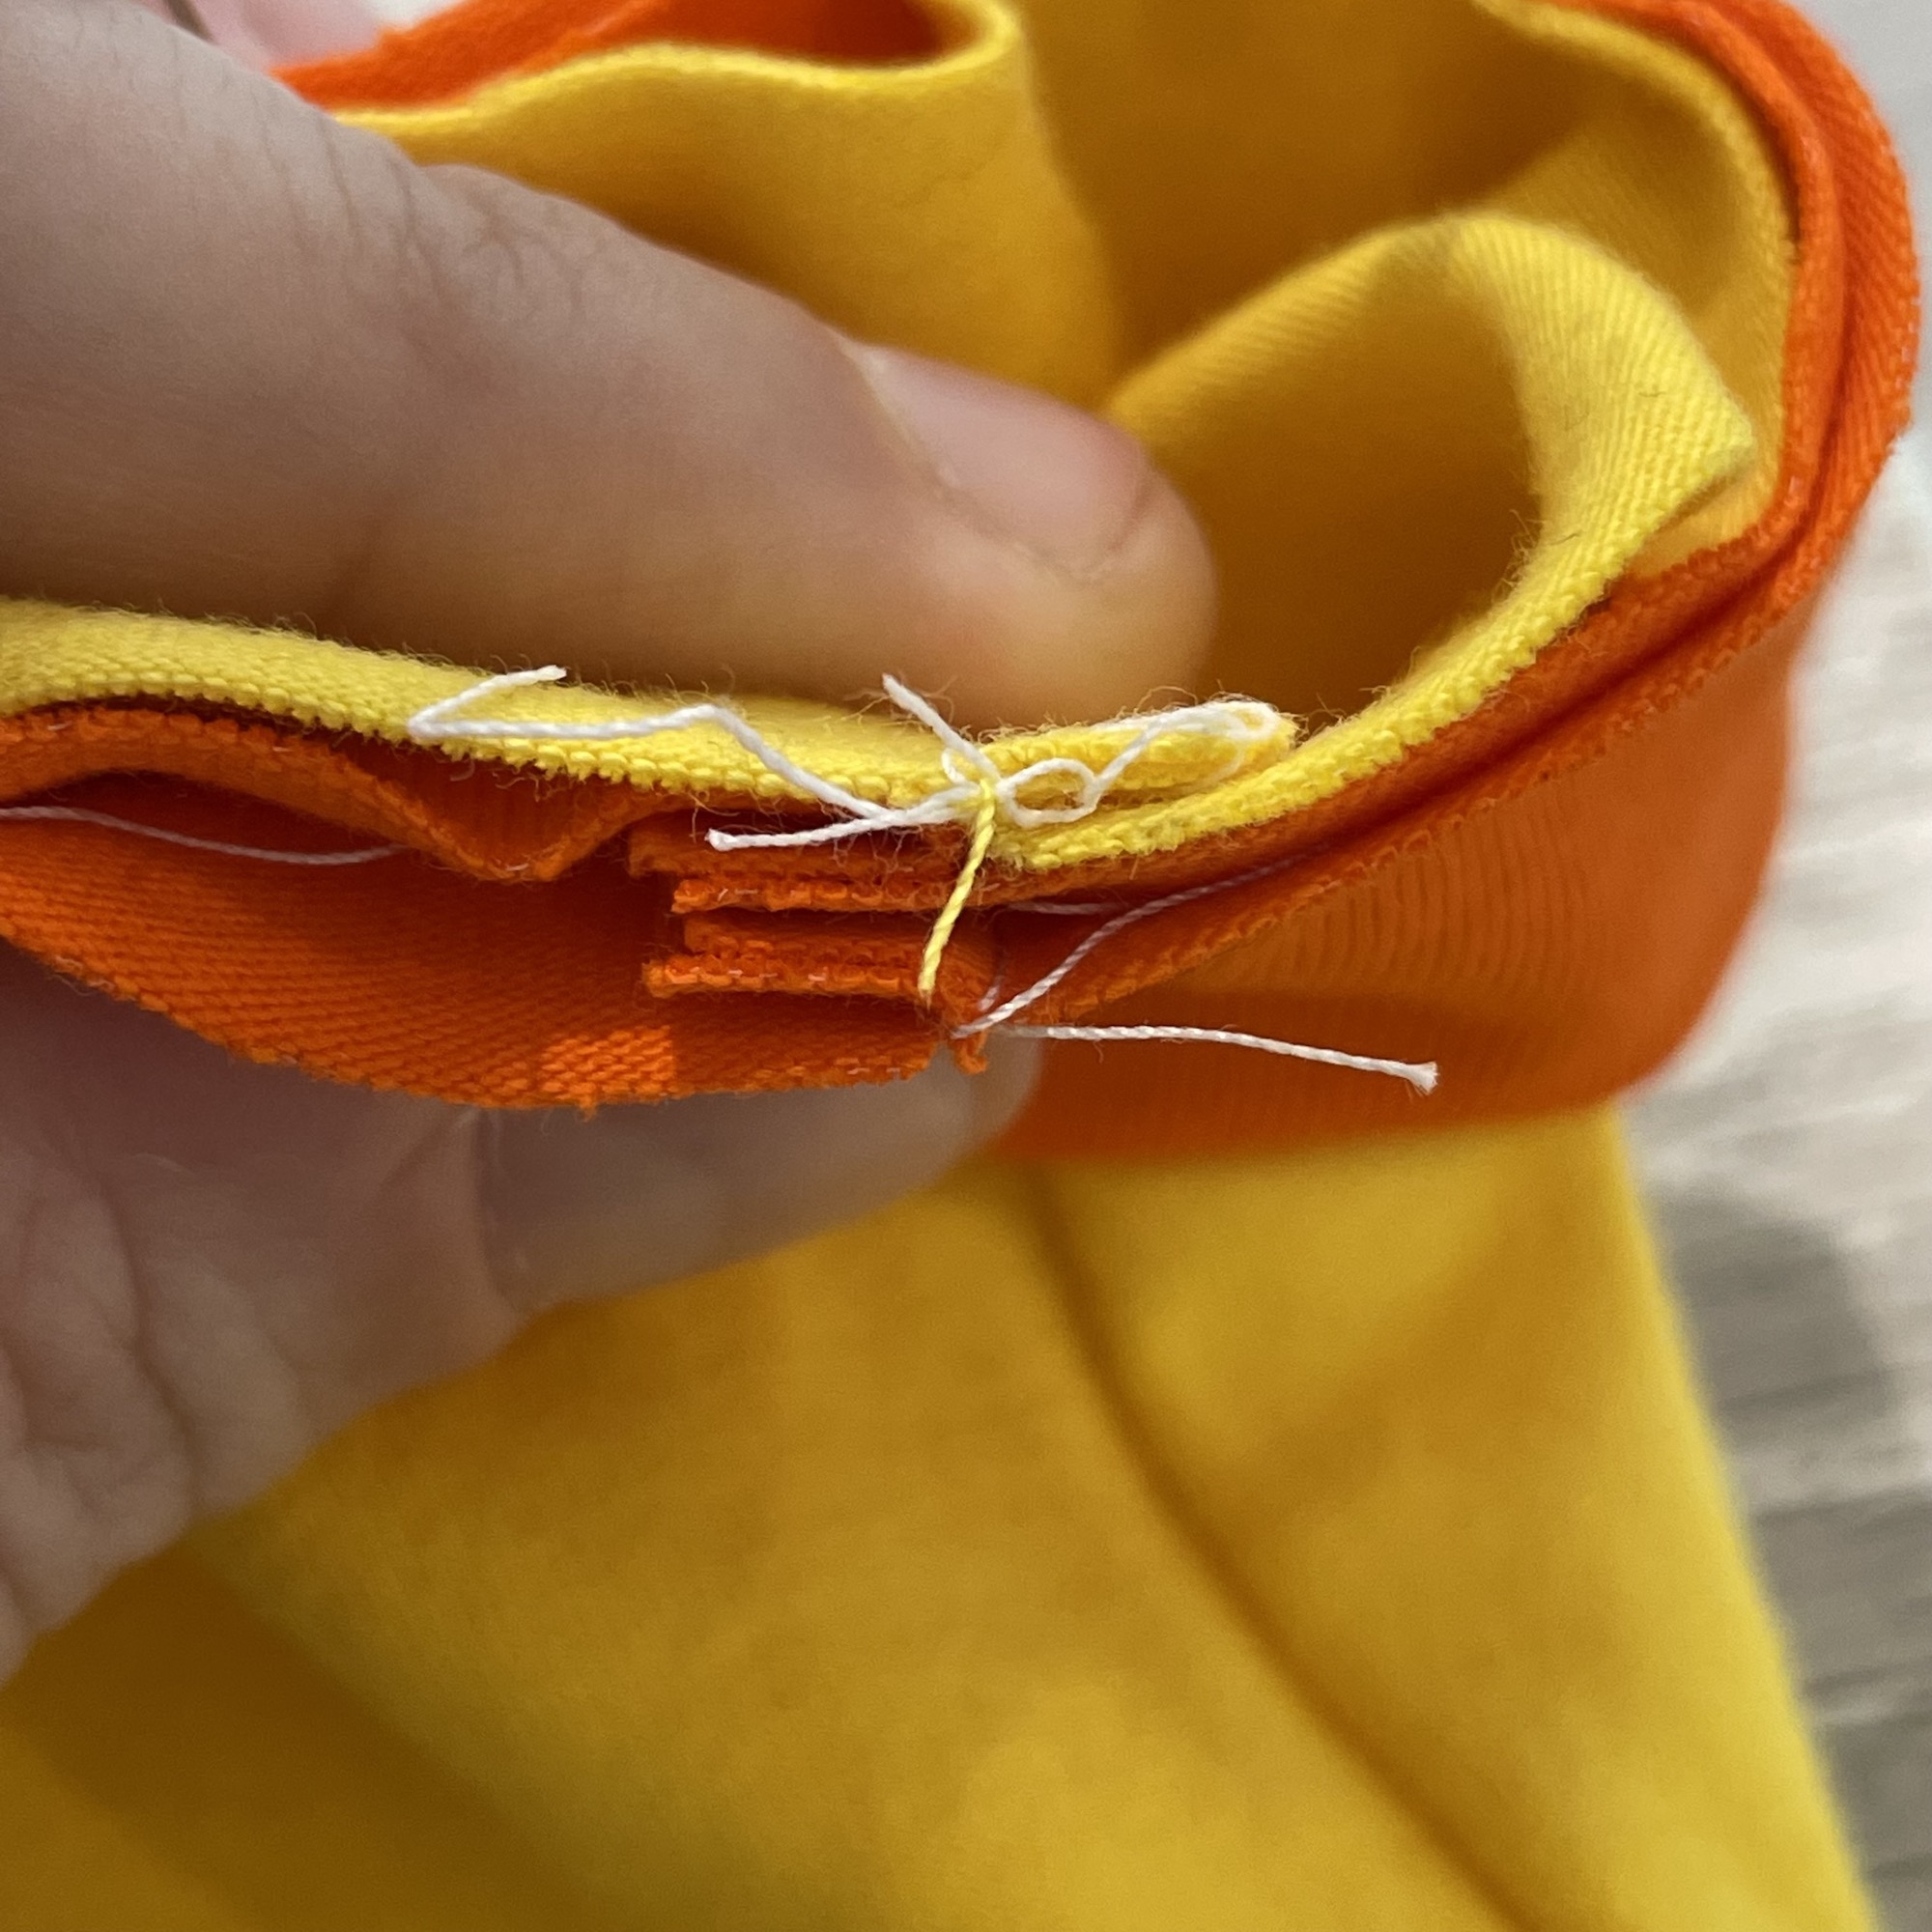
When you are folding your cuff piece into a ring, keep the seams in line with each other so that your cuff, and the seam inside the cuff, doesn’t become twisted. This will ensure the cuff lies flat once you’ve finished.
Follow these steps when pinning/clipping the cuff in place before attaching it to the garment:
- Pin the two raw edges of your cuff ring together level with the cuff’s seam
- Lay the cuff ring flat with the first pin at one side and add another pin at the opposite side
- Then add pins between the first two. Try to get these as evenly spaced as possible. Don’t be afraid to measure when adding pins to bigger cuffs like neckbands or waistbands…the more evenly you pin at this stage, the easier it will be to attach the cuffs evenly.

Now you’ll need to transfer the pinned cuff to your garment. The sleeve (or waist or neckline) opening will be bigger than your cuff which means you will need to stretch the cuff fabric to fit the opening and then sew in place. It’s really important to make sure the stretching is even or you’ll end up with fabric bunched up in one section. If you keep the evenly spaced pins in place on your cuff and then replicate the process to find the equivalent even spacing around the opening, then transfer one pin at a time (so you don’t lose its place) to attach the cuff to the opening you should ended up with the cuff pinned in place evenly. Then all you need to do is stretch the fabric just between the two pins you are sewing between, and work you way round stretching only one pinned section at a time.

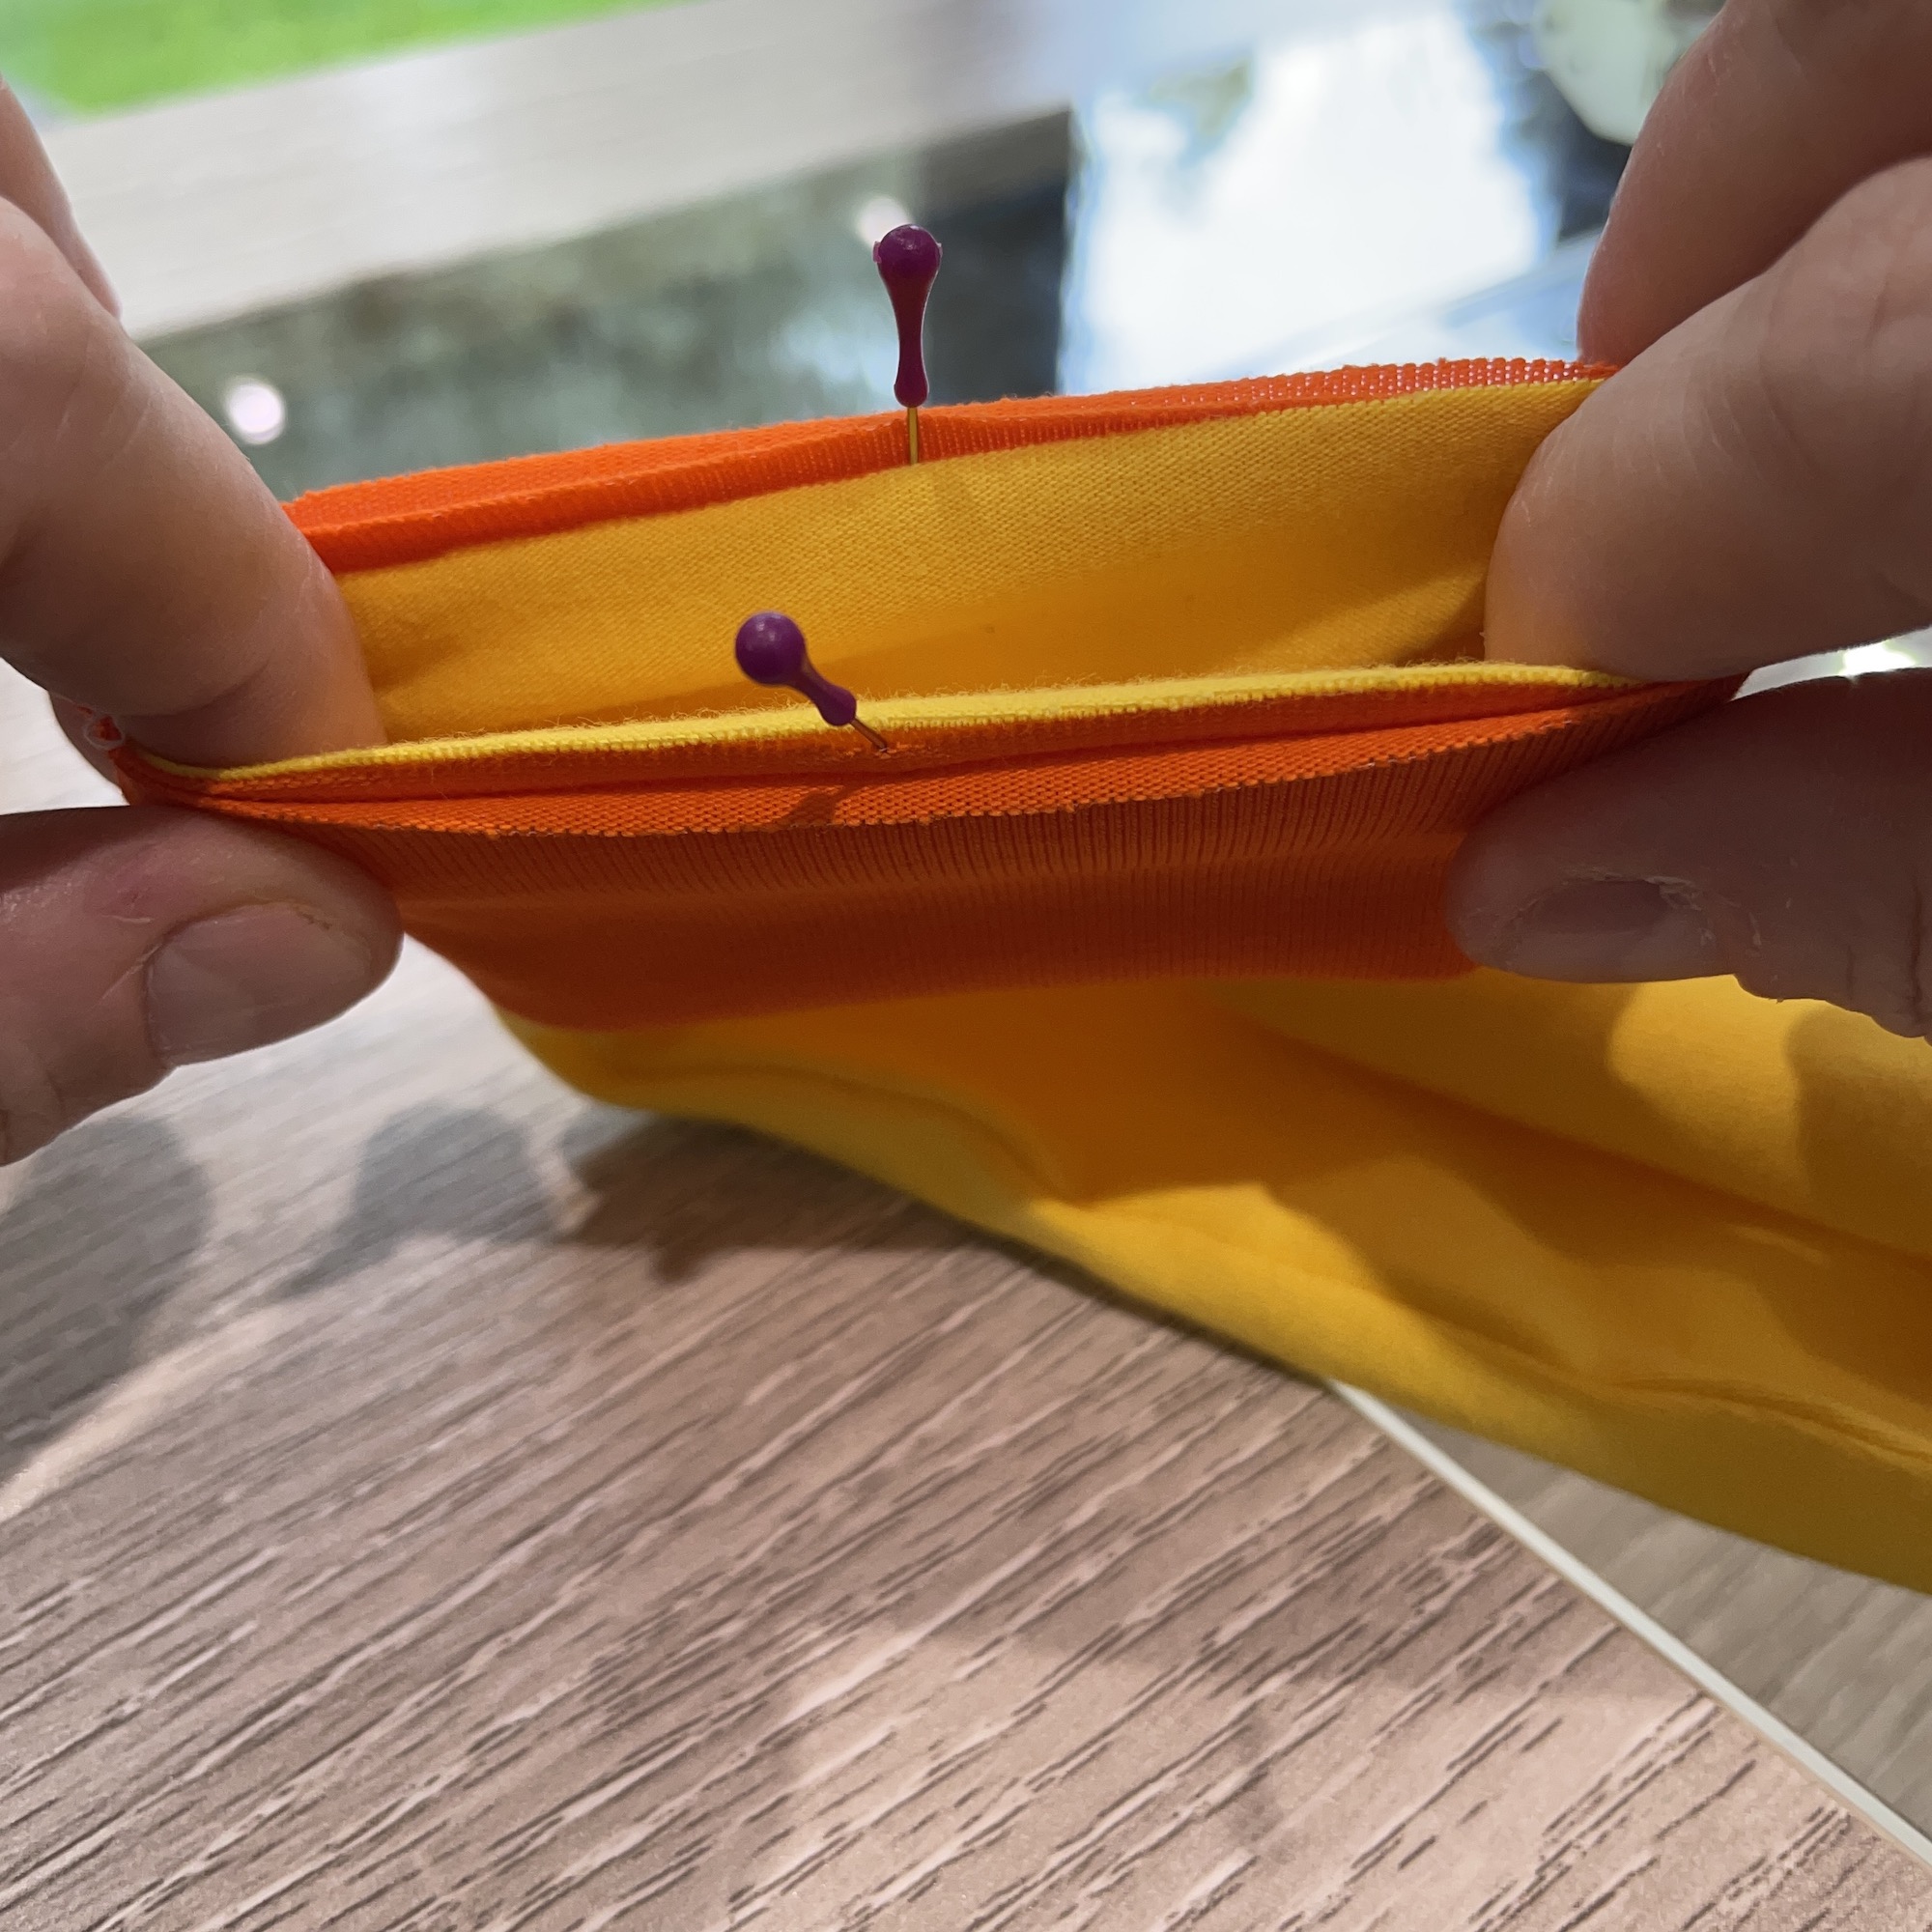
Stretch fabric can sometimes create slightly bulky seams (especially if you are using thicker cuff fabrics like ribbing) so you need to do what you can to reduce this bulk when the cuff is added to the main garment. The best thing to do it to nest your seams. This means lining up two seam lines (e.g. the one on your sleeve cuff to the one in your main sleeve construction) and making sure that the bulk of the seam fabric on the cuff and main garment piece go in alternating directions and so fit (or nest) together like jigsaw puzzle pieces.
A sleeve cuff seam could nest with the main sleeve constructions seam.
A waistband seam could nest with one of the side seams on the main body.
A neckband seam could nest with a shoulder seam OR the neckband seam line could be placed in the centre of the back body piece to help the wearer identify the front and back.
Finishing
As you do need to stretch some fabric whilst you sew a cuff or neckband into place, often the finished seam can look a little wavy. A good steam iron will usually sort this out. If it doesn’t then its quite likely that you stretch the fabric too much, or unevenly, while you were sewing.
If you are using a directional print for cuffs or neckbands, getting the print to be the right way up on the finished garment can be a little of a mind-bender.
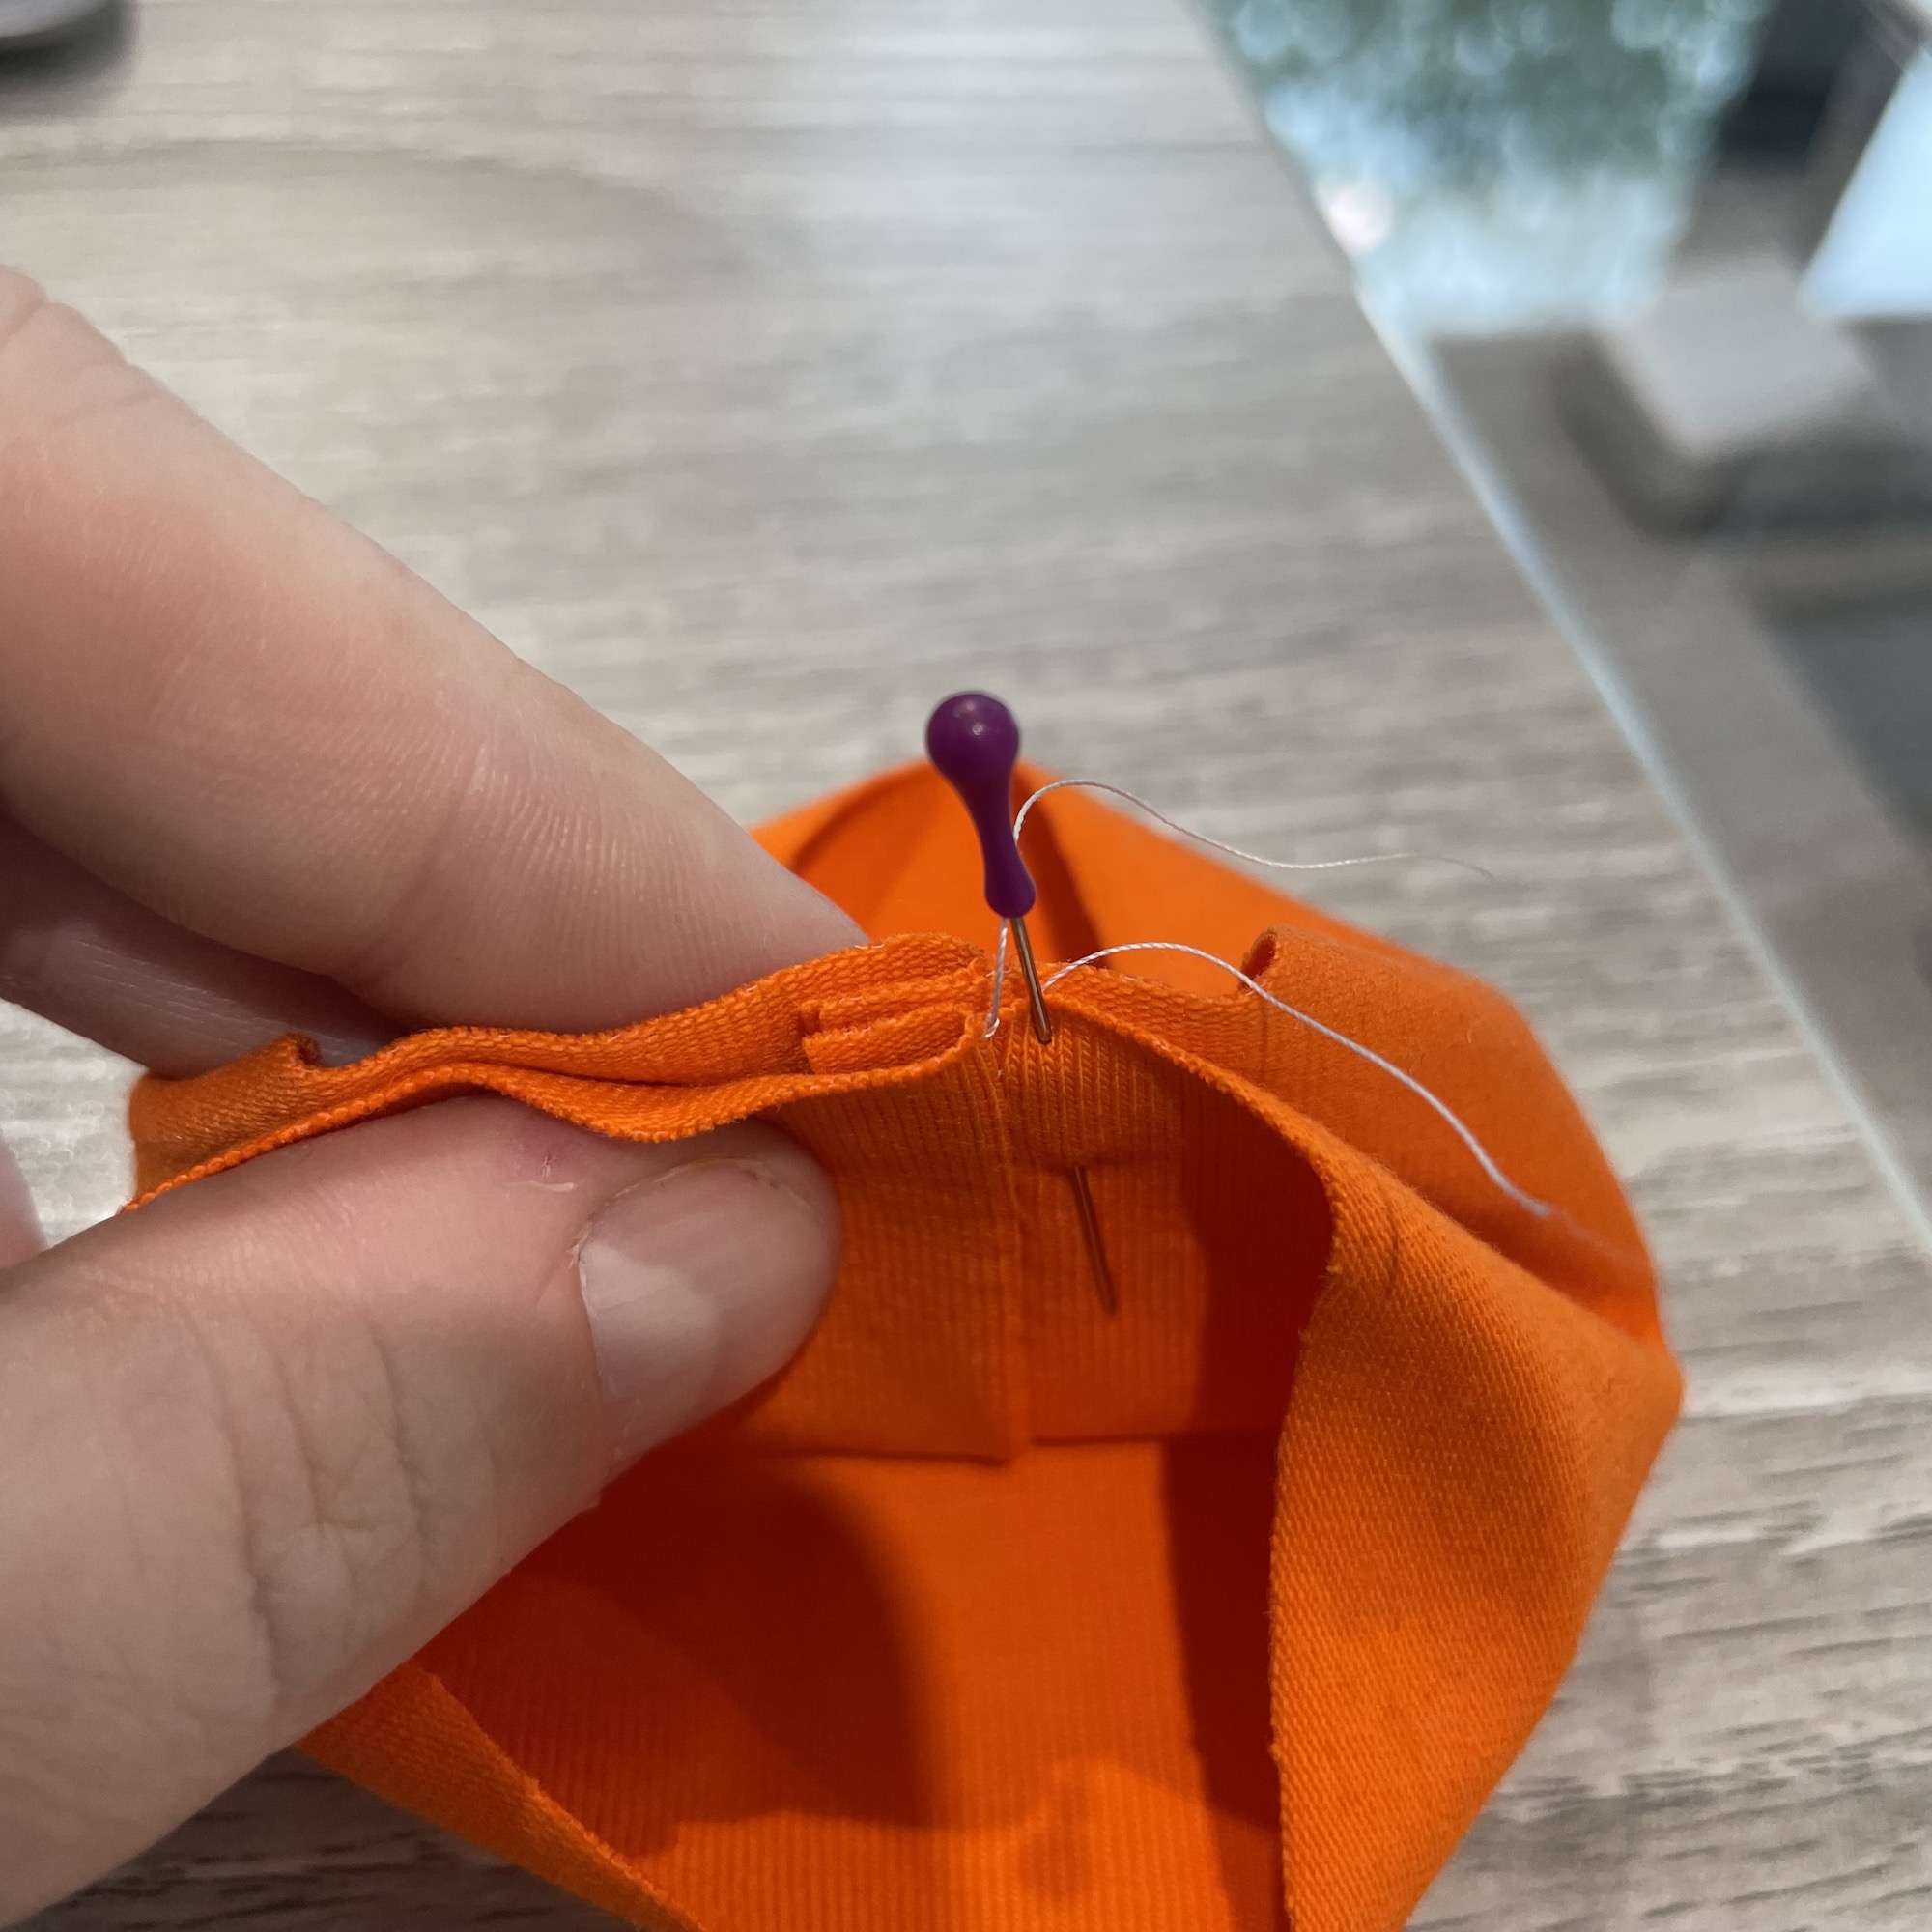
When you make a cuff using directional fabric, because the cuff is formed by folding the fabric ring in half, one side of the cuff (the outside, for example) will have the print the right way up and the other side (the inside, for example) will have the print the wrong way up.
If you are adding the cuff by placing it on the outside of your sleeve , position your sleeve so the raw edge is facing up, pin the cuff to the outside/right side of the sleeve with your directional print facing the correct way as you look at it and with the correct side of the cuff against the right side of the sleeve fabric. Like this:
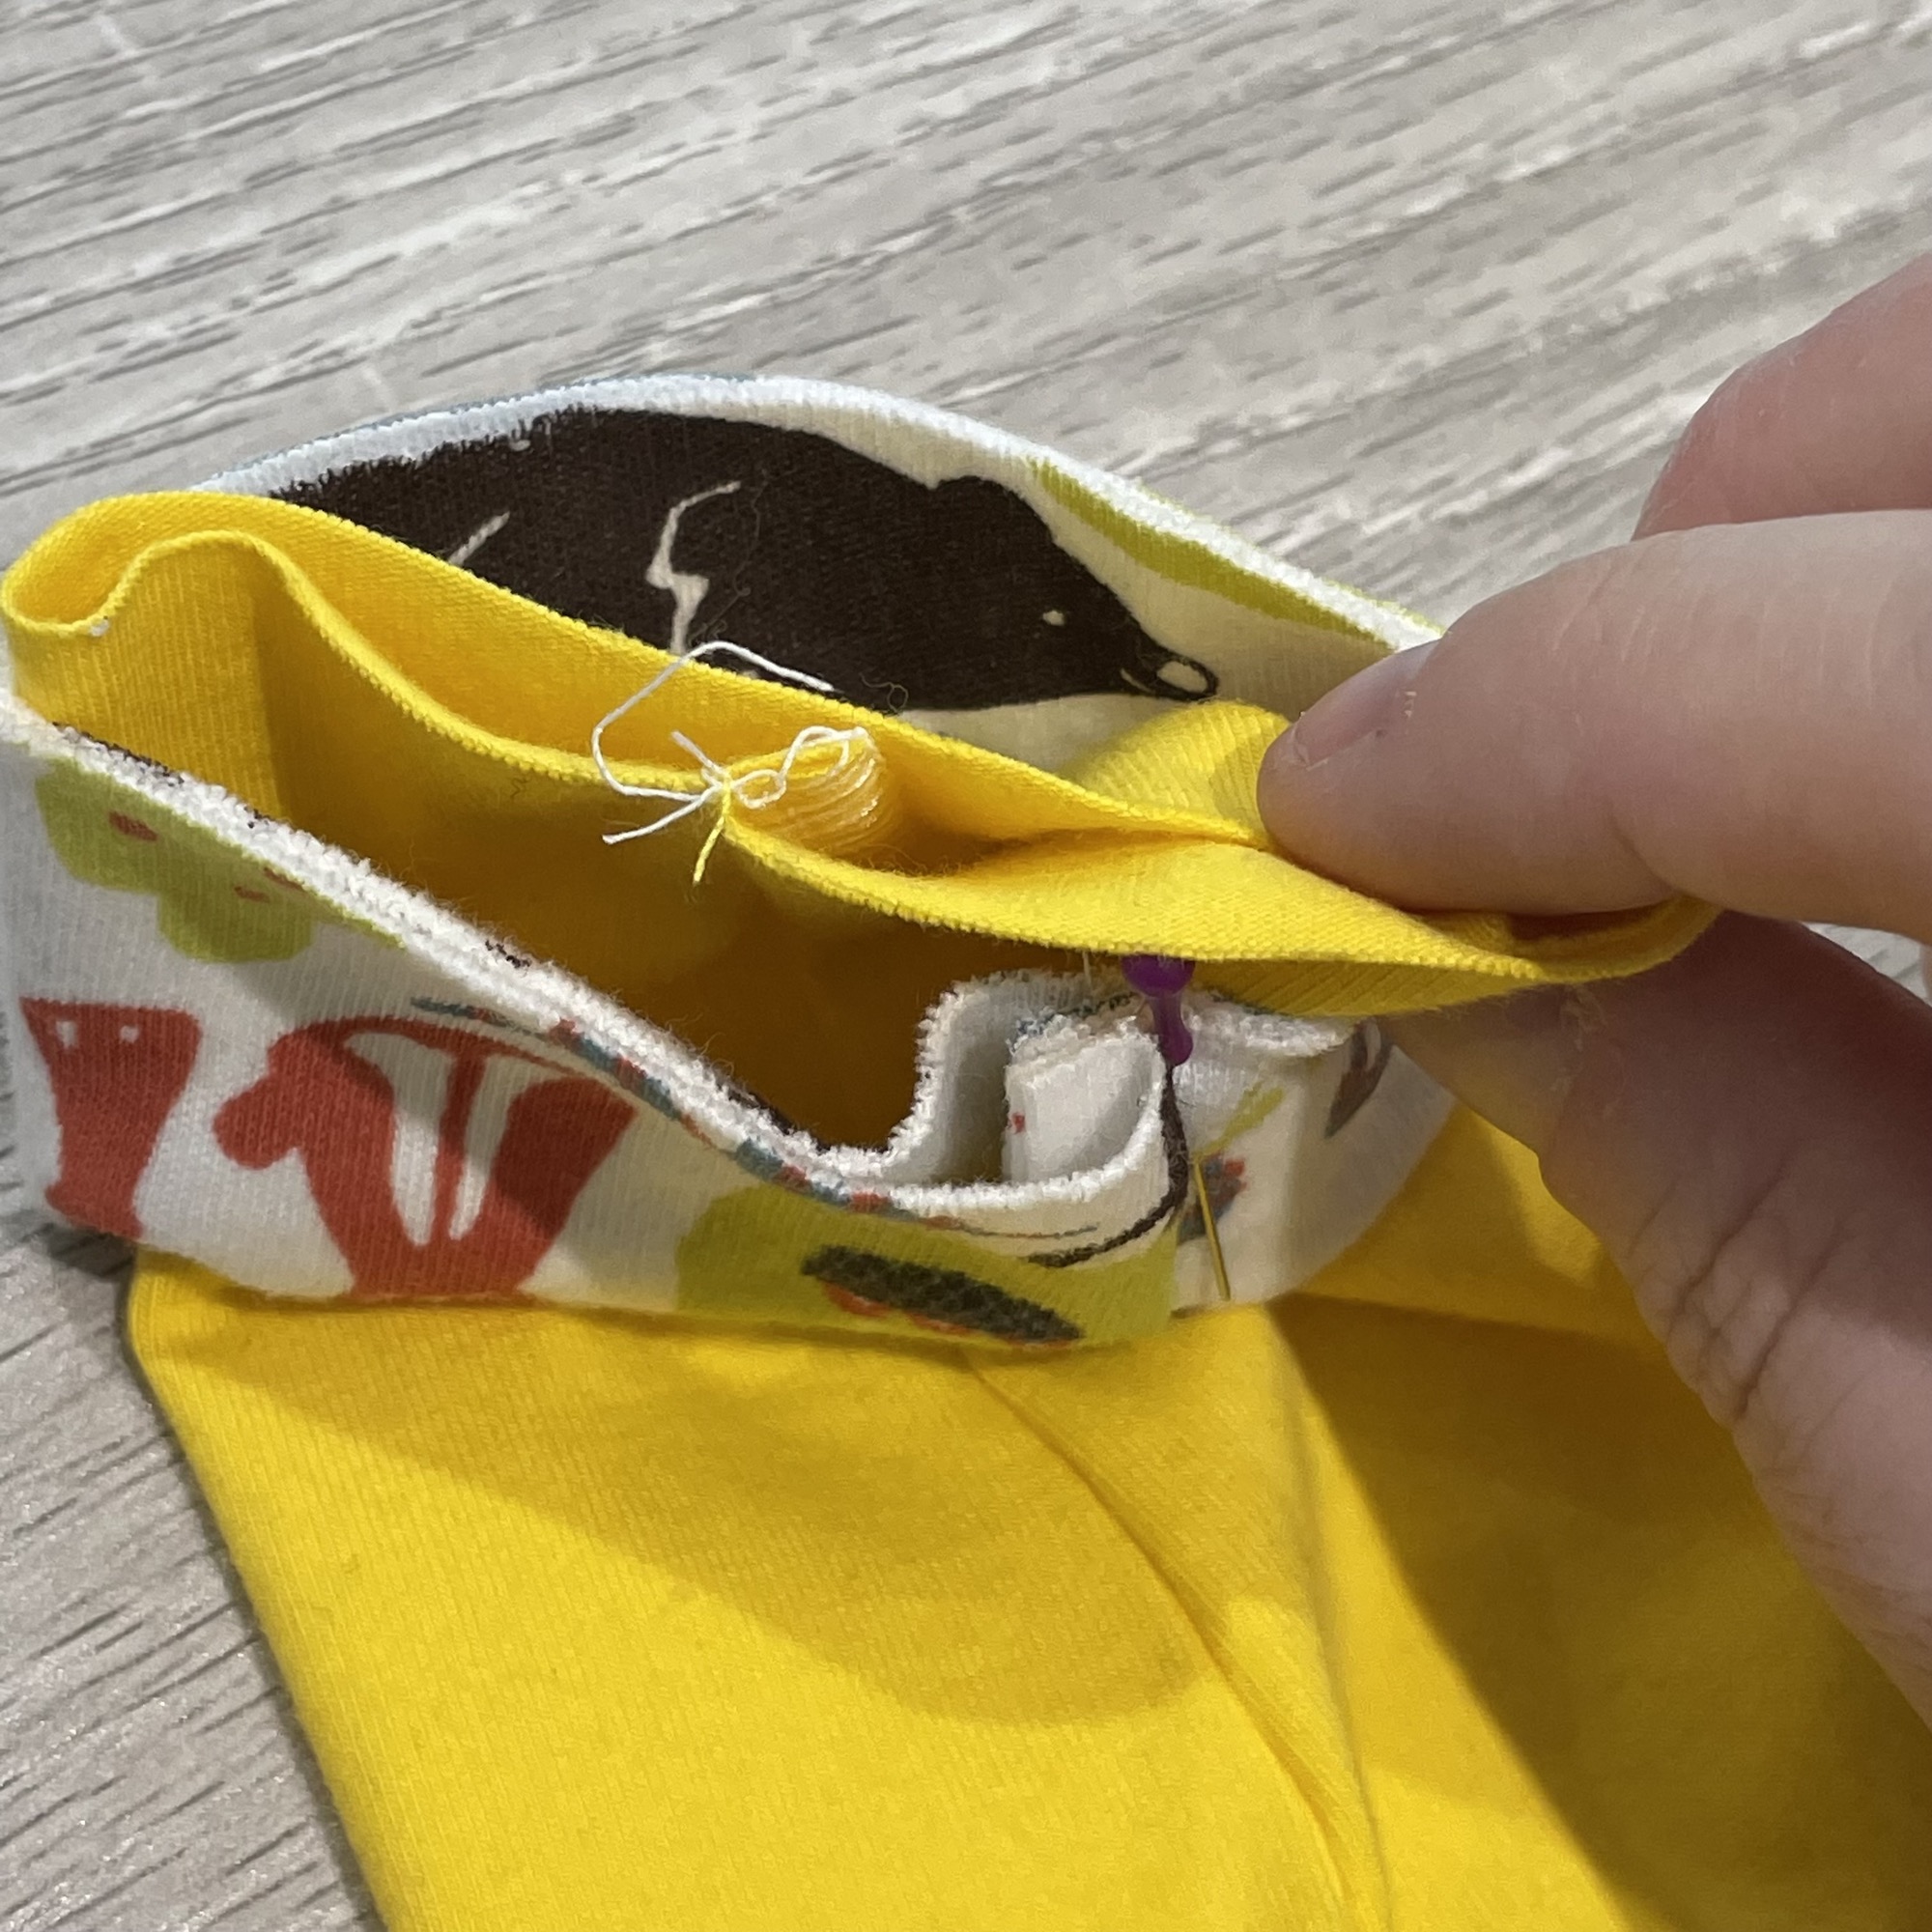
If you are adding the cuff by placing it inside your sleeve, position your sleeve so the raw edge is facing up, pin the cuff to the inside/right side of the sleeve with your directional print facing the correct way as you look at it and with the correct side of the cuff against the right side of the sleeve fabric. Like this:
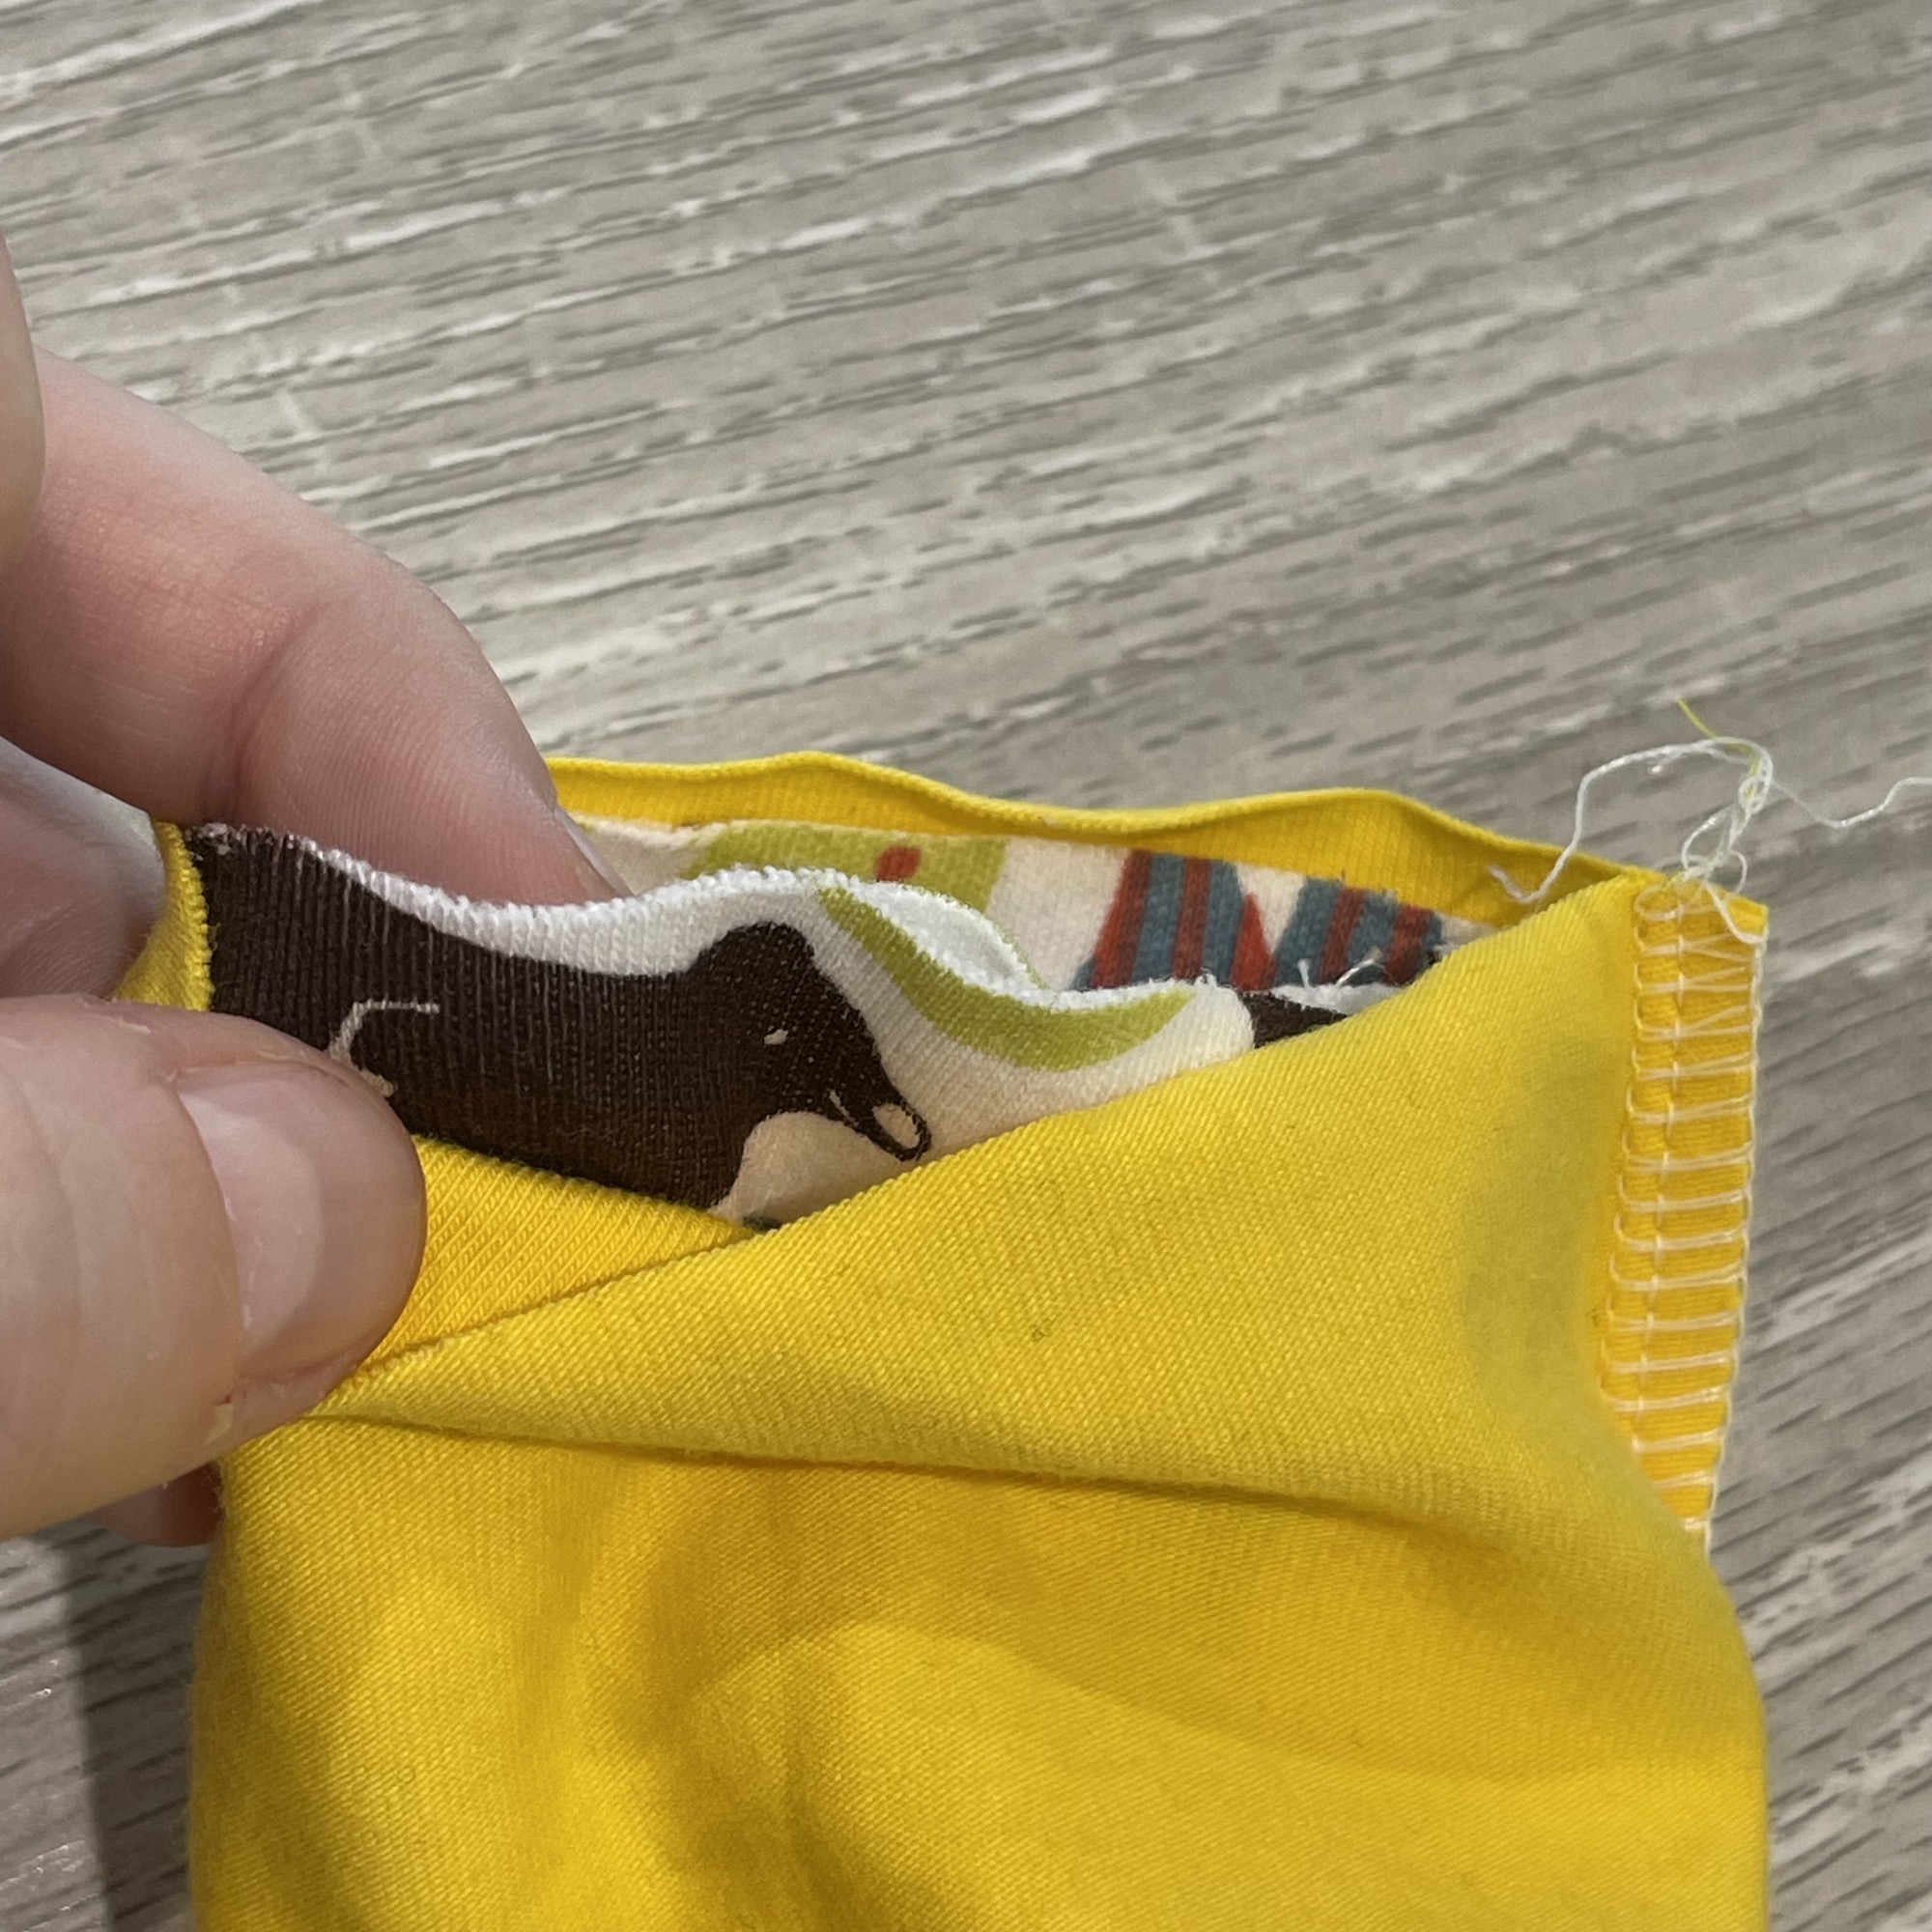
The most important thing to keep in mind when adding a directional print cuff is always work with the raw edge of your garment part (e.g. sleeve, hem etc) facing up. With this garment position you’ll always want the directional print to look the right way up to you as you pin. You will also always want the the correct side of the cuff (the side with the directional print in the correct direction) to be against the right side of the garment.
Waves & Wild patterns with cuffs
Over a third of all the Waves & Wild patterns currently on sale have cuffs, or an option to use cuffs, so sewing successful cuffs is a great skill to master. If you are keen to try out cuff sewing, or want to add some more cuffed patterns to your selection then here’s a full list off all the cuffed patterns…
Adventurer Raglan Sweatshirt
Beach Bummies
Beep Beep Raglan Sweatshirt
Cottesloe Cowl (children’s)
Cottesloe Cowl (ladies’)
Cottesloe Cowl (men’s)
Double Trouble Joggers
Driftwood Dolman (children’s)
Driftwood Dolman (ladies’)
Driftwood Dolman (men’s)
Emi T-Shirt and Dress
Four Seasons Joggers (children’s)
Four Seasons Joggers (ladies’)
Harem Pants
High Kick Harem Joggers
Hot Chocolate
Hot Coffee (ladies’)
Hot Coffee (men’s)
I CAN Zip Hoodie
Lightning Leggings
Lunar T-Shirt
Speedy Pants
Superhero Boxers
Superstar Bra
Wonder Undies
This is very helpful. Thankyou so much for the great explanations, also the photos really helped me.