
Oh Christmas Tree, Oh Christmas Tree…

The festive season is upon us and it’s time for some Christmas sewing. Whilst I love all the Christmas jumpers out there (sweaters/pullovers for my non-British friends. Check out the British Christmas jumper obsession here), I don’t think jumpers should get all the glory so I have created a super fun Christmas skirt!

To make this skirt you will need:
- The Double Bubble Skirt Pattern and fabric as stated in the instructions.
- A maximum of 1 metre green tulle (Try and get the soft kind, not the stiff, scratchy kind. Also, you need to make sure you get wide tulle, not the narrow rolls. A quick google search was all it took for me to source 300cm wide tulle, but if you’re struggling you could always join two smaller pieces to create the necessary width.)
- Something to decorate your Christmas tree with. I used crafting pom poms, but I think tinsel, a few little bells or even battery powered fairy lights would work too!

Instructions
- Follow the main Double Bubble tutorial up to the end of step 3.
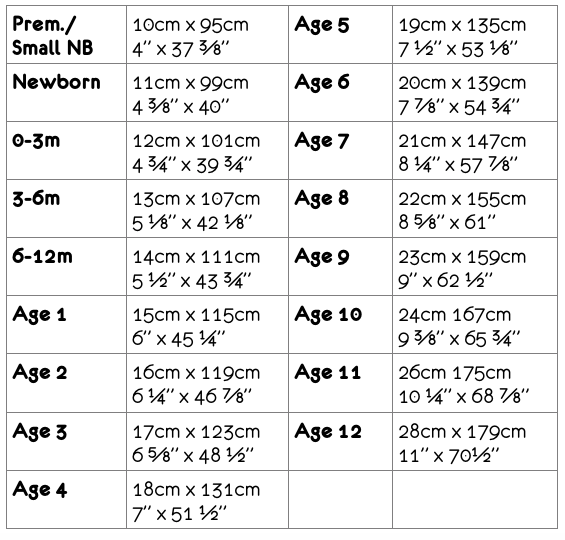
______________________________________________________________________________________________________ - Cut some strips of green tulle using the following measurements. I recommend 2 for baby/toddler sizes and 3 for child sizes, but you can experiment with more or less.
- Fold each strip of tulle in half, lengthways so you have double layer strips with the fold at the bottom. I recommend basting along the long top edge as it will make the next step much easier!
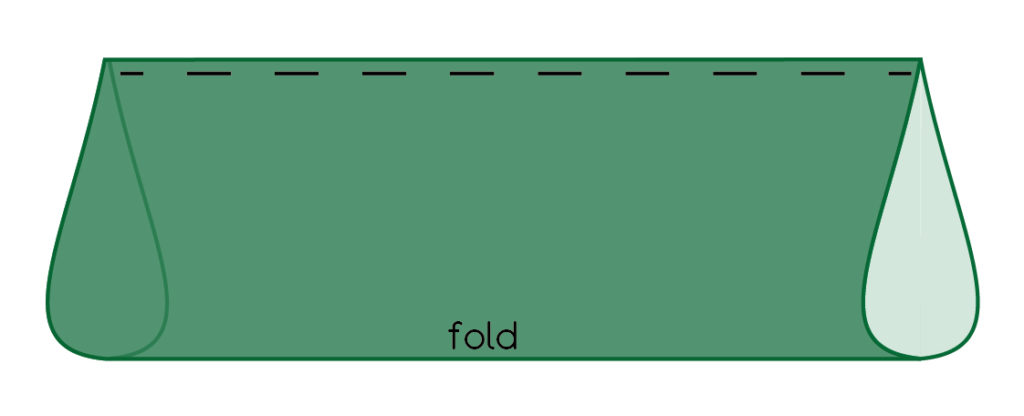
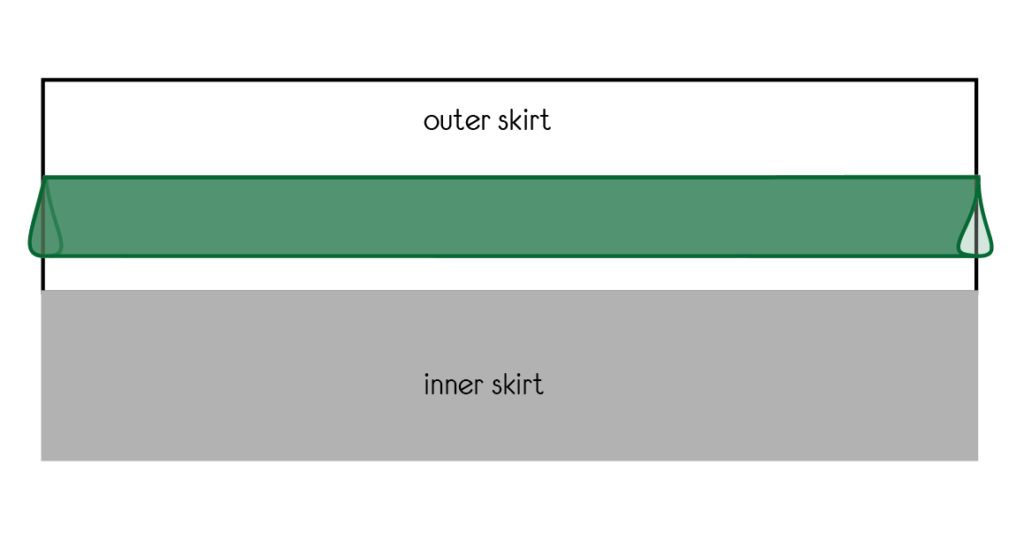
- Lay your skirt out flat with the right side of the fabric facing you. Place one of your folded tulle strips approximately halfway down your outer fabric, the fold should be facing the bottom of your skirt and the basted edge of the strip should face towards the top of your skirt. Pin in place.
- Before sewing anything, place your remaining tulle folds on top of the first to see how the finished skirt might look and double check you’re happy with the placement of the first. When finished, the folds will overlap each other so that the top of each fold is hidden under the one above. The last tulle fold should sit right at the top of the skirt, with the raw edge of the tulle flush with the raw edge of the outer skirt fabric. If you’re happy with how your folds are going to fit, then remove all but the first tulle fold, and sew the first one in place. Use a straight or stretch stitch (depending on your fabric choice) and sew just a couple of millimetres (1/8″) from the raw edge.
______________________________________________________________________________________________________ - Repeat the process with your remaining tulle folds until all are sewn in place. Your tulle folds should now all be sewn down along the long edges, but open at the short edges. There will be a little of your main outer fabric showing at the bottom.

- Take one short edge of your skirt. Pin and baste the tulle to the main skirt fabric, a few millimetres (1/8″) from the skirt edge.

- Your tulle folds should now only have one open end (the other short end). This is the fun part! You need to post your Christmas tree decorations into the folds! Let your imagination run wild!! (But make sure not to overload them.) Once you’re happy with the decorations then baste the tulle down on the last short edge.
______________________________________________________________________________________________________ - Continue with the main instruction from the Double Bubble Pattern.
______________________________________________________________________________________________________ - Stick on some Christmas tunes and dance!


To complete the 80s-tastic look I used the Amber Singlet (vest/tank) for the red vest. For the cropped sweatshirt I used a Hot Chocolate, cut about a third of the length and hemmed it, widened the neckline, then created a facing for the neckline instead of using a neckband.
1 Comment