Do you have the perfect pants (trousers) pattern but wish it had a shorts option? It’s so easy to alter the pattern yourself! Let me show you how.
Pick Your Pattern
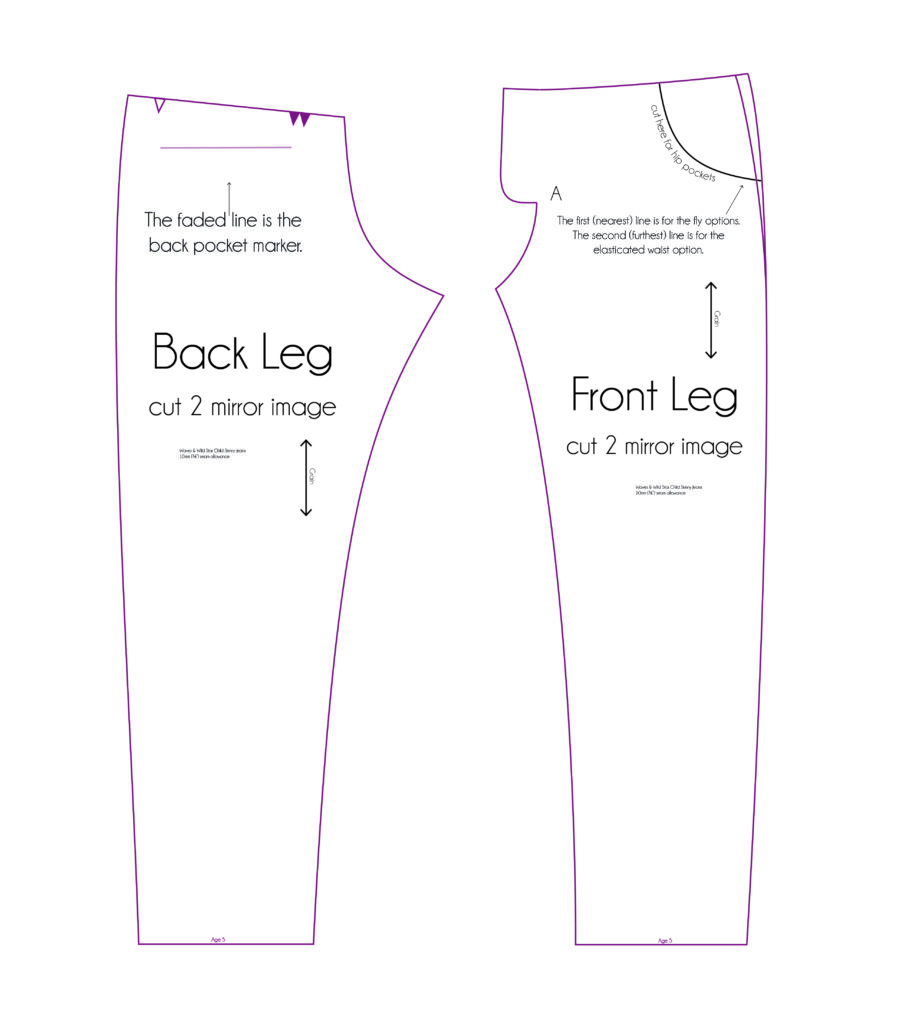
1. Choose the pattern you want to shorten and print out the size that fits your model. For this tutorial, I’m using the Star Child Skinny Jeans pattern.
Choose Your Finished Length
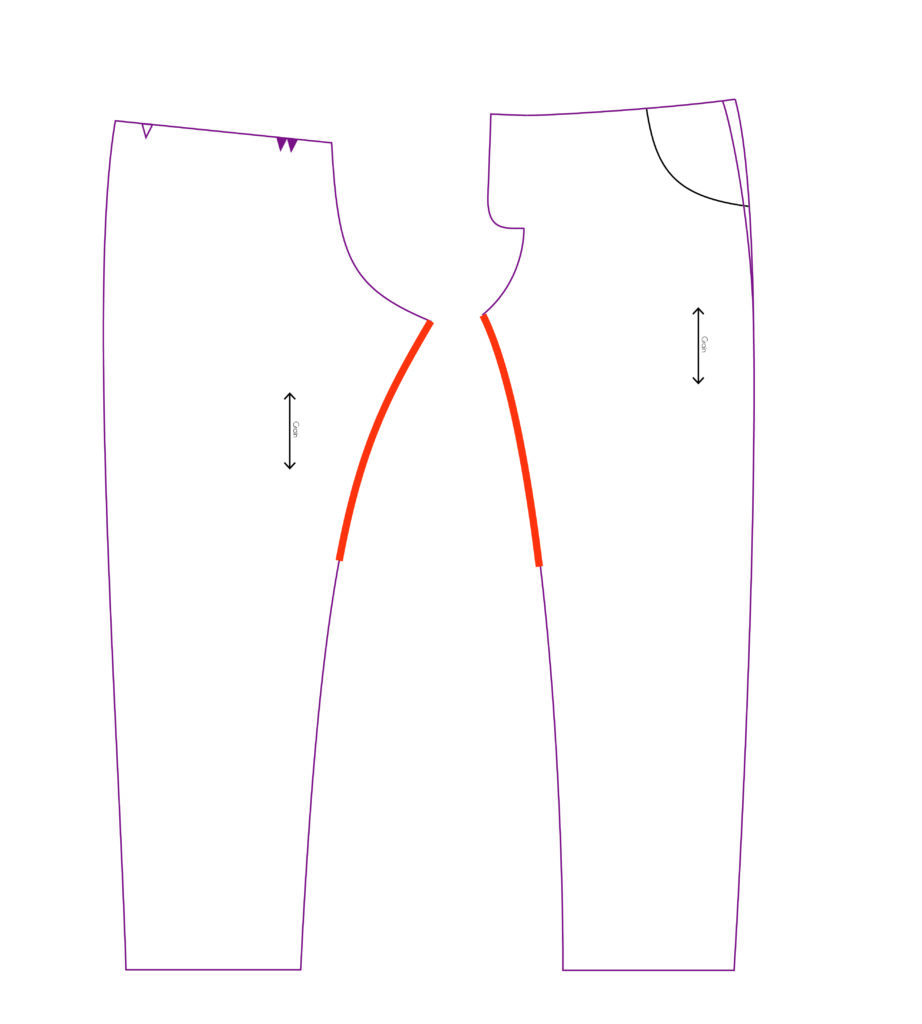
2. I find it easiest to start with the inside leg when choosing the length I want. However, if you know the outside leg measurement, or the amount you want to remove from the finished pants length, you can start with either of those too.
Measure both the front and back leg pieces and make sure they’re the same.
TIP: Use a flexible tape measure or piece of string when measuring curves.
Choose Your Finished Length
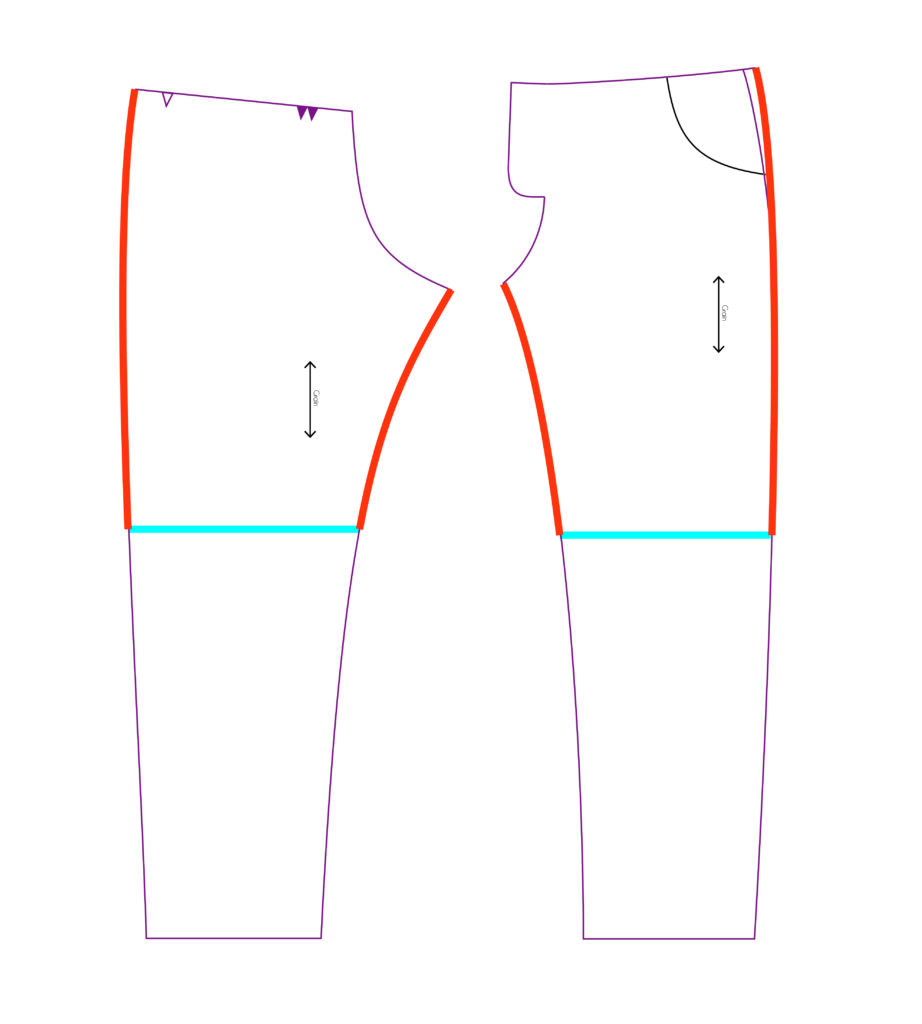
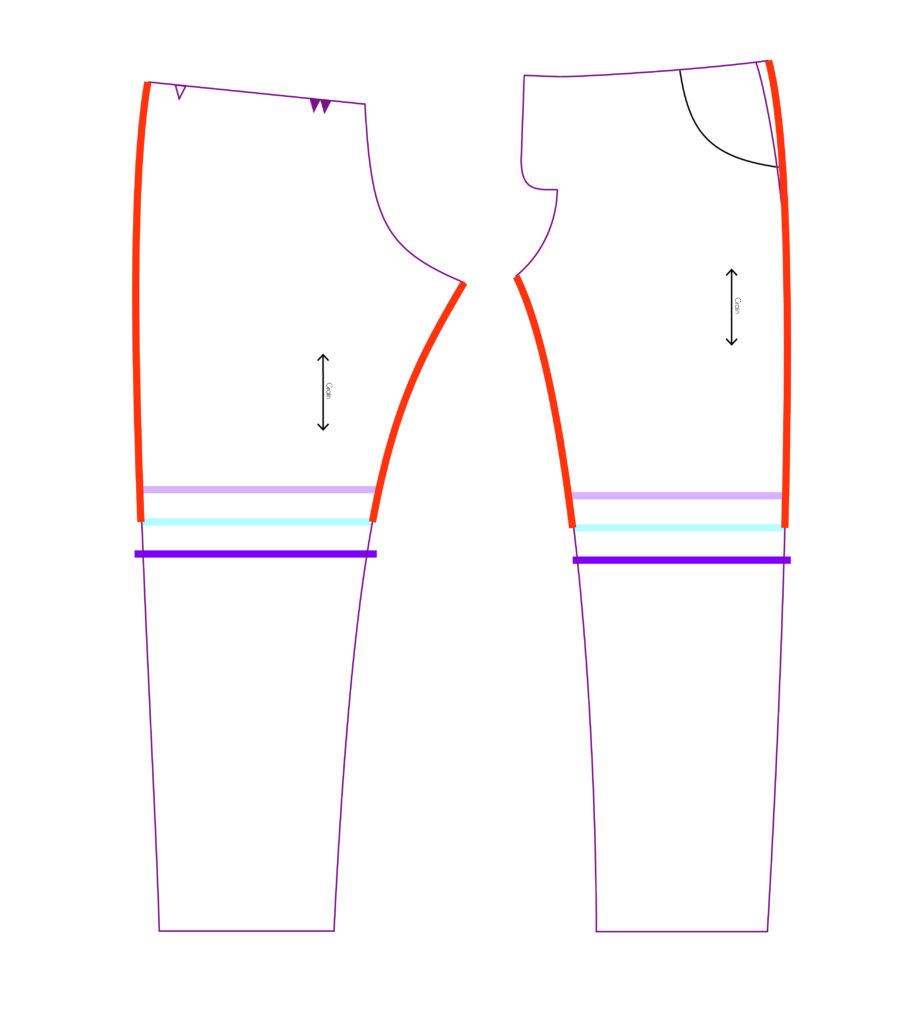
3. Draw a line across which will become your finished shorts length (THIS IS NOT A CUT LINE!). In this diagram it is the blue line. Check that your outside leg measurements are the same. You may need to adjust your blue, finished length line to work with your inside and outside leg seams.
Decide On Your Hem Depth
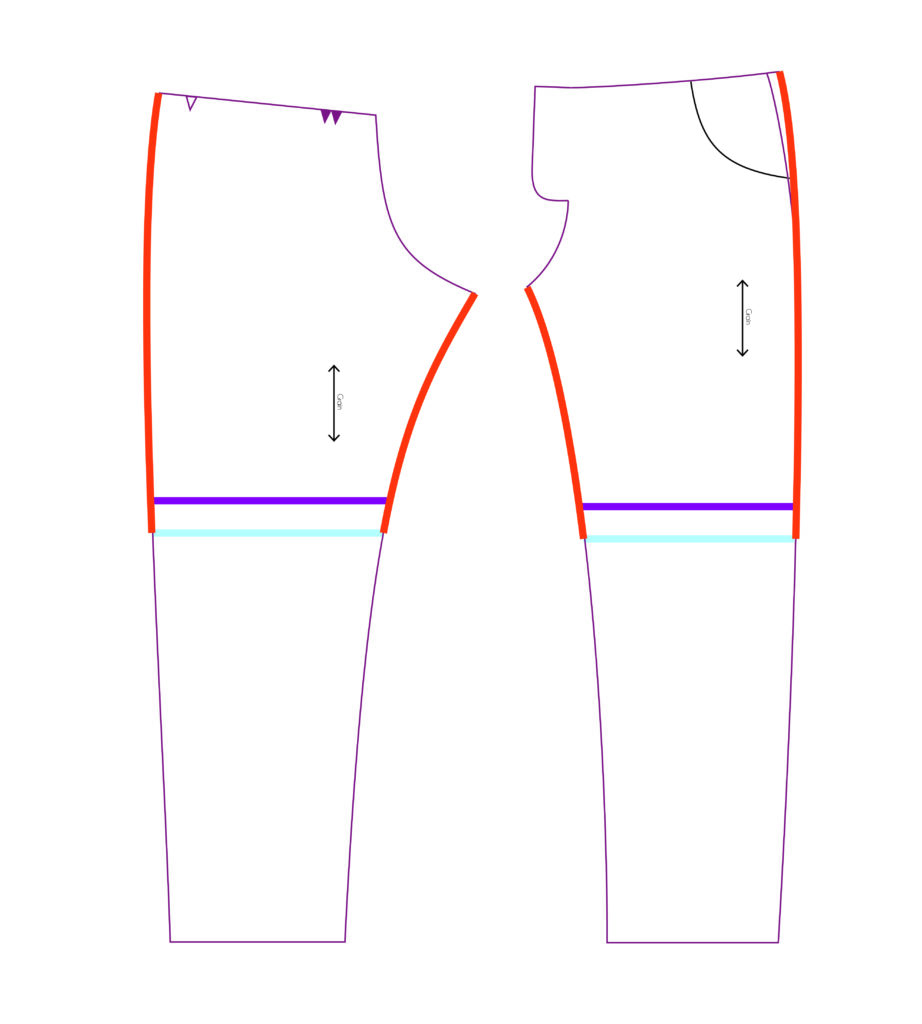
4. Decide how deep you would like your hems to be. If you’re unsure, 25mm (1″) works well in most situations and I will use it through the rest of this tutorial.
On your paper pattern pieces, mark a line 25mm (1″) ABOVE your blue finished length line. On these diagrams this is shown in purple. This line is where your hem stitching will go. Because pants tend to me wider at the top and narrower at the ankle, your purple line will likely be longer than your blue line. This is important for the next step! Measure each purple line and make a note of each length.
Draw Your Cut Lines
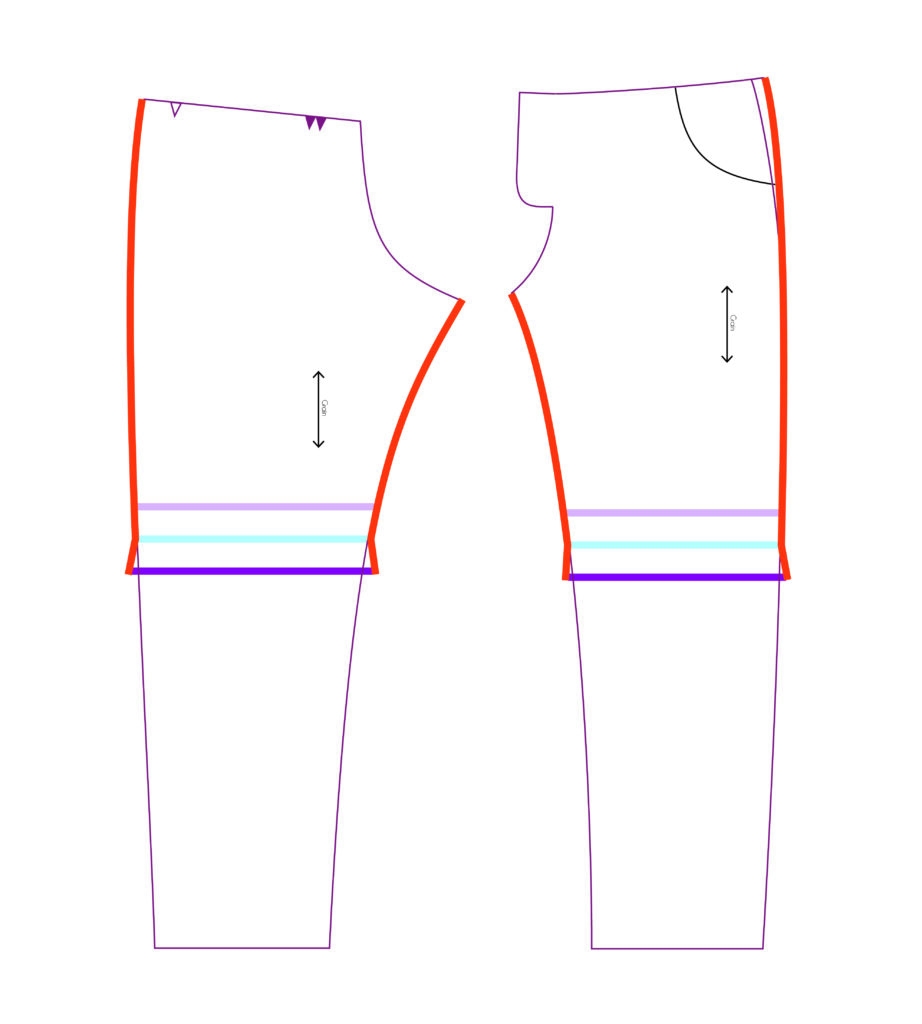
5. Draw cut lines, 25mm (1″) BELOW your blue, finished length lines. These cut lines should be the same length as the purple lines you drew in the previous step. These lines should overhang the original pattern.
Finish Your New Hem
6. Draw lines from your orange inside and outside leg seams to join with your purple finished cut lines. You will create a little flare/kick out. The reason for the last few steps is to create a hem that will fold up and sit neatly. If you just chopped the pattern and went ahead and sewed, the hem would not sit properly and you’d end up with wrinkles/puckers.
You're Ready To Sew!
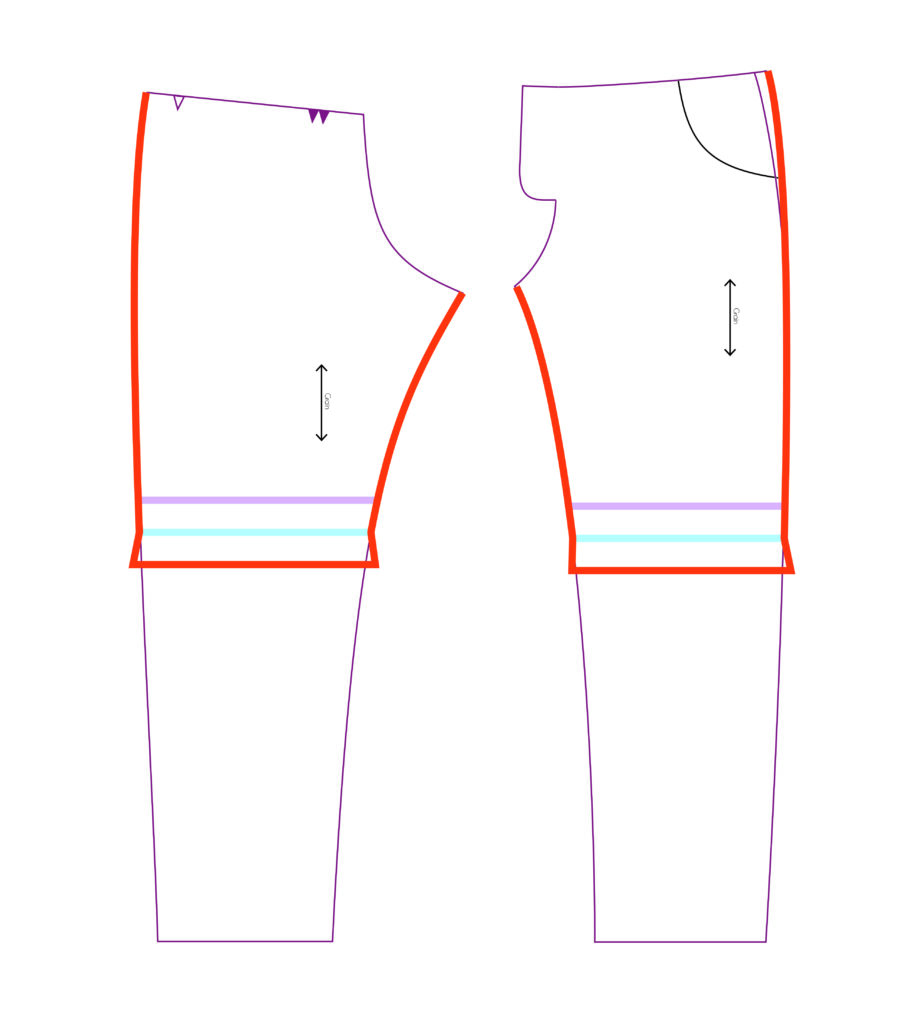
7. The orange lines are now your cut lines. You can go ahead and cut your fabric and sew your shorts!
We use cookies on our website to give you the most relevant experience by remembering your preferences and repeat visits. By clicking “Accept”, you consent to the use of ALL the cookies.
This website uses cookies to improve your experience while you navigate through the website. Out of these, the cookies that are categorized as necessary are stored on your browser as they are essential for the working of basic functionalities of the website. We also use third-party cookies that help us analyze and understand how you use this website. These cookies will be stored in your browser only with your consent. You also have the option to opt-out of these cookies. But opting out of some of these cookies may affect your browsing experience.
Necessary cookies are absolutely essential for the website to function properly. These cookies ensure basic functionalities and security features of the website, anonymously.
Cookie
Duration
Description
cookielawinfo-checbox-analytics
11 months
This cookie is set by GDPR Cookie Consent plugin. The cookie is used to store the user consent for the cookies in the category "Analytics".
cookielawinfo-checbox-functional
11 months
The cookie is set by GDPR cookie consent to record the user consent for the cookies in the category "Functional".
cookielawinfo-checbox-others
11 months
This cookie is set by GDPR Cookie Consent plugin. The cookie is used to store the user consent for the cookies in the category "Other.
cookielawinfo-checkbox-necessary
11 months
This cookie is set by GDPR Cookie Consent plugin. The cookies is used to store the user consent for the cookies in the category "Necessary".
cookielawinfo-checkbox-performance
11 months
This cookie is set by GDPR Cookie Consent plugin. The cookie is used to store the user consent for the cookies in the category "Performance".
viewed_cookie_policy
11 months
The cookie is set by the GDPR Cookie Consent plugin and is used to store whether or not user has consented to the use of cookies. It does not store any personal data.
Functional cookies help to perform certain functionalities like sharing the content of the website on social media platforms, collect feedbacks, and other third-party features.
Performance cookies are used to understand and analyze the key performance indexes of the website which helps in delivering a better user experience for the visitors.
Analytical cookies are used to understand how visitors interact with the website. These cookies help provide information on metrics the number of visitors, bounce rate, traffic source, etc.
Advertisement cookies are used to provide visitors with relevant ads and marketing campaigns. These cookies track visitors across websites and collect information to provide customized ads.


Thank you for the tutorials. I have learnt a few things that I can now use to help with my sewing journey.
This is exactly what i was looking for, thank you!