
Ruffle Tutorial Part 1
I’ve had quite a few requests for help adding ruffles to nappies, so thought I would create a couple of tutorials for you. I’ll talk you through two slightly different ways to make a detachable ruffle nappy. These are by no means the only ways to make ruffle nappies, but should give you somewhere to start…
I always make my ruffles detachable. This makes your nappy more versatile as the ruffle can be removed to go under clothing. Also, the ruffle will keep its looks for longer if you hand wash it which isn’t possible if it is sewn direct onto the nappy. If you want your ruffle to be attached to your nappy, follow these steps but sew directly onto your nappy, rather than the rectangle.
I love minky ruffles. Minky doesn’t fray so doesn’t need overlocking or hemming, and it just looks so plush and gorgeous!
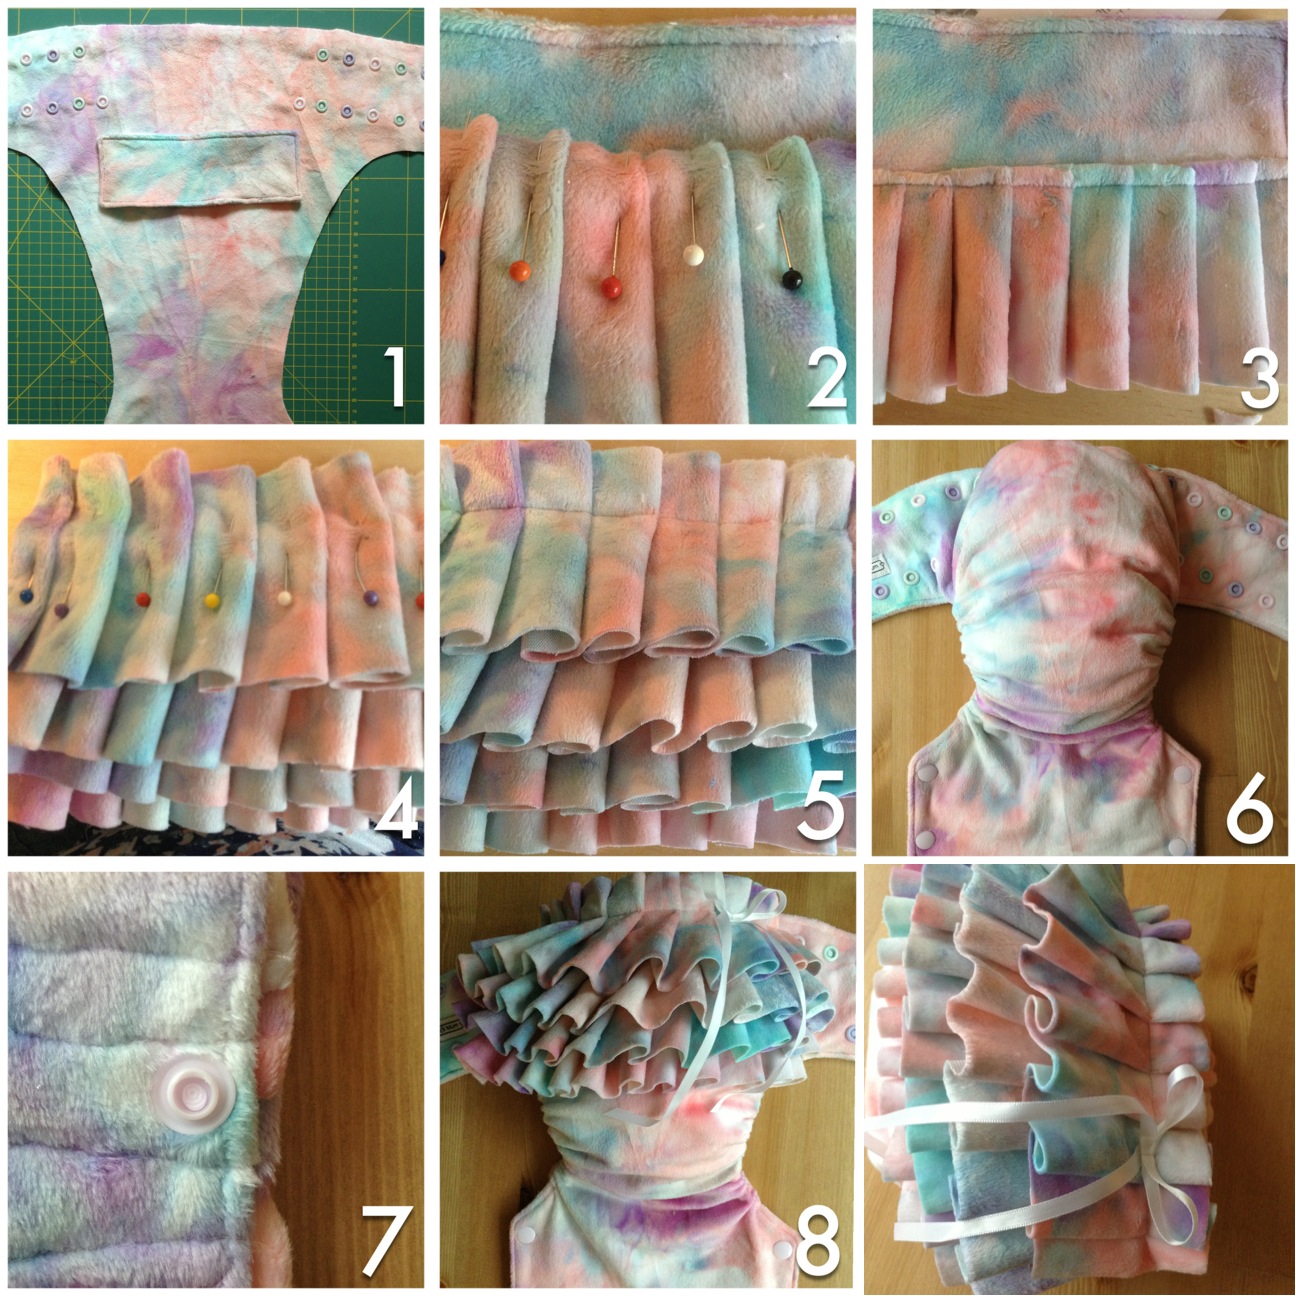
1. Cut and snap a nappy pattern piece in your chosen minky. To hold your ruffles you need to prepare a little minky rectangle, the size of which depends on the nappy pattern you are using. You want it to reach almost from snaps to snaps. If you are using my OSFM pattern a 19 x 7cm (7 1/2” x 2 3/4”) rectangle is a good starting point. Sew two rectangles, right sides together. Clip the corners, turn and topstitch. You then need to add two extra snaps which will hold your ruffle to your nappy pattern piece. You can just see mine in photo 1 (the extra pale pink snaps on the bottom row). If you are making a particularly bulky/heavy ruffle you may wish to add an third snap to hold your rectangle; this will prevent any chance of it sagging (there’s nothing worse than a saggy butt!).
2. Cut your strips of minky. For a large or OSFM nappy I think 4 ruffles is the minimum. On a smaller nappy you may only need 3. Cut all but one strip the same size. The length of your strips depends on how dramatic you want your ruffle to be. The width should be about 3 times the width of your rectangle. The strips I used here were 60 x 7cm (23 1/2” x 2 3/4”).
You want to cut one strip a little larger. This will be the top strip you attach. I made mine about 60 x 9cm (23 1/2” x 3 1/2”).
3. Using pins, attach your first strip towards the bottom of the rectangle. Fold the strip into little pleats, using a pin for each one.
4. Sew the first pleat in place, about 6mm (1/4”) from the top edge. Repeat for the next two strips.
5. For the last strip, pin it in place in pleats as before, but this time sew it in place about 2cm (3/4”) from the top edge. This just just gives your finished pleats a better look.
6. Finish sewing up your nappy.
7. Hold your finished pleat up to your finished nappy to discover where you need to attach your final snaps. If you used my pattern and measurements this will be right at the edge of your rectangle. Use a pin or dressmaker’s pen to mark the spot and attach two snaps.
8. You can finish here, or you can sew on a ribbon for extra prettiness!
Attach your ruffle/pleat and admire your handiwork!
Leave a Reply